Management certificates
For first-time setup, follow this order: prepare the local identity → import peer trust → enable HTTPS or tunnel TLS → verify access. Then return to Center and edge deployment to enroll the site. Configure data synchronization TLS separately in that guide.
Choose the connection to protect
| Connection | Identity and trust |
|---|---|
| Browser / Watchdog → Studio HTTPS | Studio provides its server identity; Watchdog and the browser separately trust its CA. |
| Browser / Studio → Watchdog HTTPS | Watchdog provides its own server identity; Studio and the browser separately trust its CA. |
| Watchdog → Studio management tunnel | Both ends use TLS; Studio provides its identity and Watchdog trusts the center CA. |
Tunnel TLS does not encrypt the browser's HTTP connection to a center mapping port. Provide a matching HTTPS endpoint for that segment when required. Check machine clocks and the actual connection hostname or IP before configuring certificates.
Open certificate maintenance
Open Studio → Tunnel → Certificate maintenance, or Watchdog → Tunnel management → Certificate maintenance. TLS is optional. HTTP management and TCP tunnels do not require certificates. SyncBridge and GatewayMqtt have separate certificate settings in Gateway.
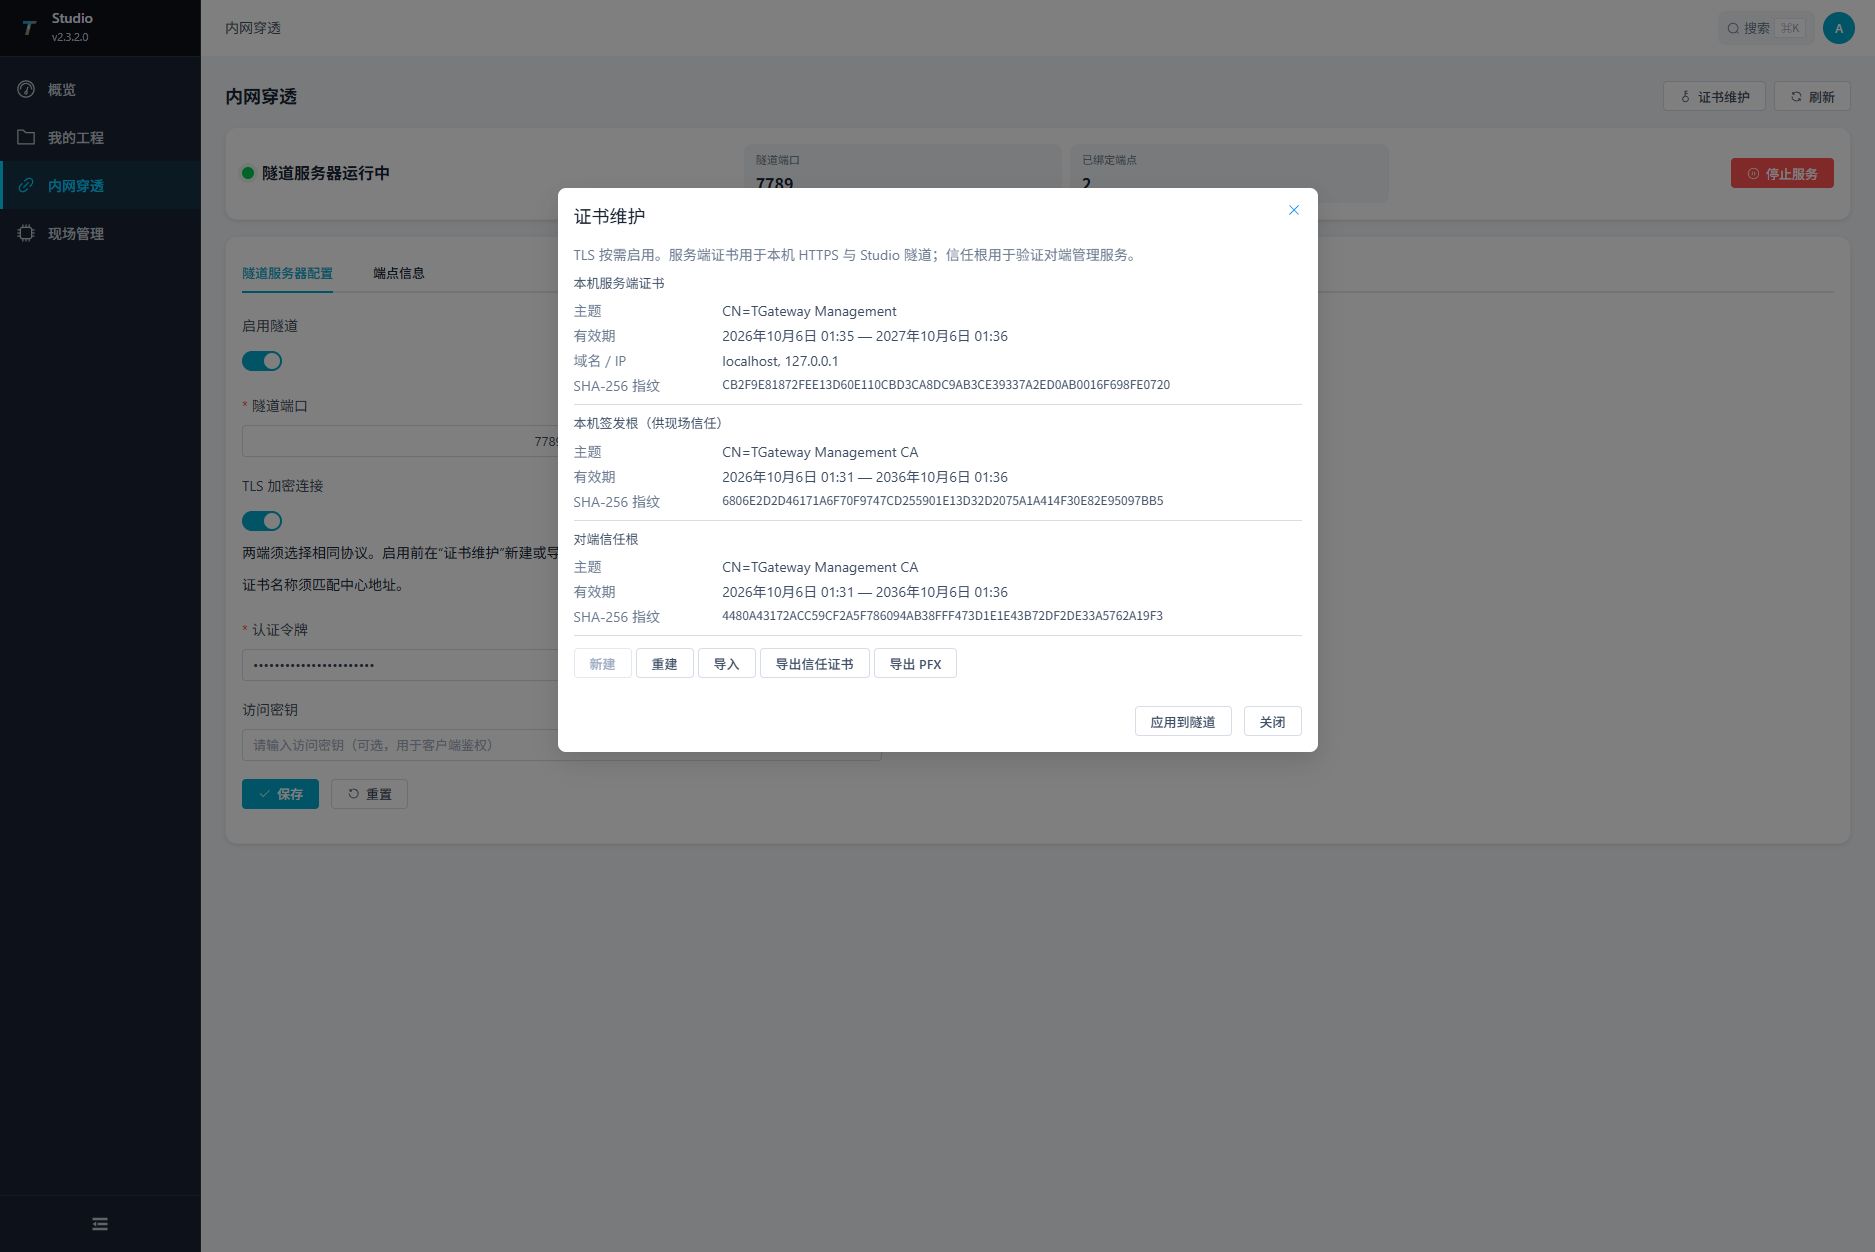
Certificate roles
| Field | Description |
|---|---|
| Local server identity | The certificate used by this host. Check its validity and the DNS names or IP addresses clients use. |
| Local issuing CA | The public CA that signed the local identity. Export it for peers to trust. |
| Trusted peer CA | The root used to validate remote management HTTPS and TLS tunnels. It contains no peer private key. |
| SHA-256 fingerprint | Compare fingerprints before and after import. Matching subject names alone do not establish trust. |
Create and rebuild
- Click Create for a host without an identity.
- Enter the actual DNS names or IP addresses, separated by lines or commas. Omit schemes, ports and paths.
- Choose a validity period from 1 to 825 days and execute the operation.
- Check the resulting names, dates and issuing CA fingerprint.
- Use Rebuild to issue a fresh server key and certificate under the existing local CA. Peers already trusting that CA do not need another import.
Use a center address reachable from the site. localhost on a different machine refers to that machine. When accessing Watchdog HTTPS through a reverse mapping, the Watchdog identity must match the center hostname actually used by the caller.
Imported PFX identities do not include a CA signing key. Renew them through the original issuer and import the new PFX; local rebuild is unavailable.
Trust Studio from Watchdog
- In Studio, select Export trusted certificate to download the public PEM CA.
- In Watchdog, select Import → Trusted peer CA, choose the PEM and execute.
- Compare the Watchdog trusted CA fingerprint with the Studio issuing CA fingerprint.
- Continue with HTTPS listeners or management tunnel TLS below, as required.
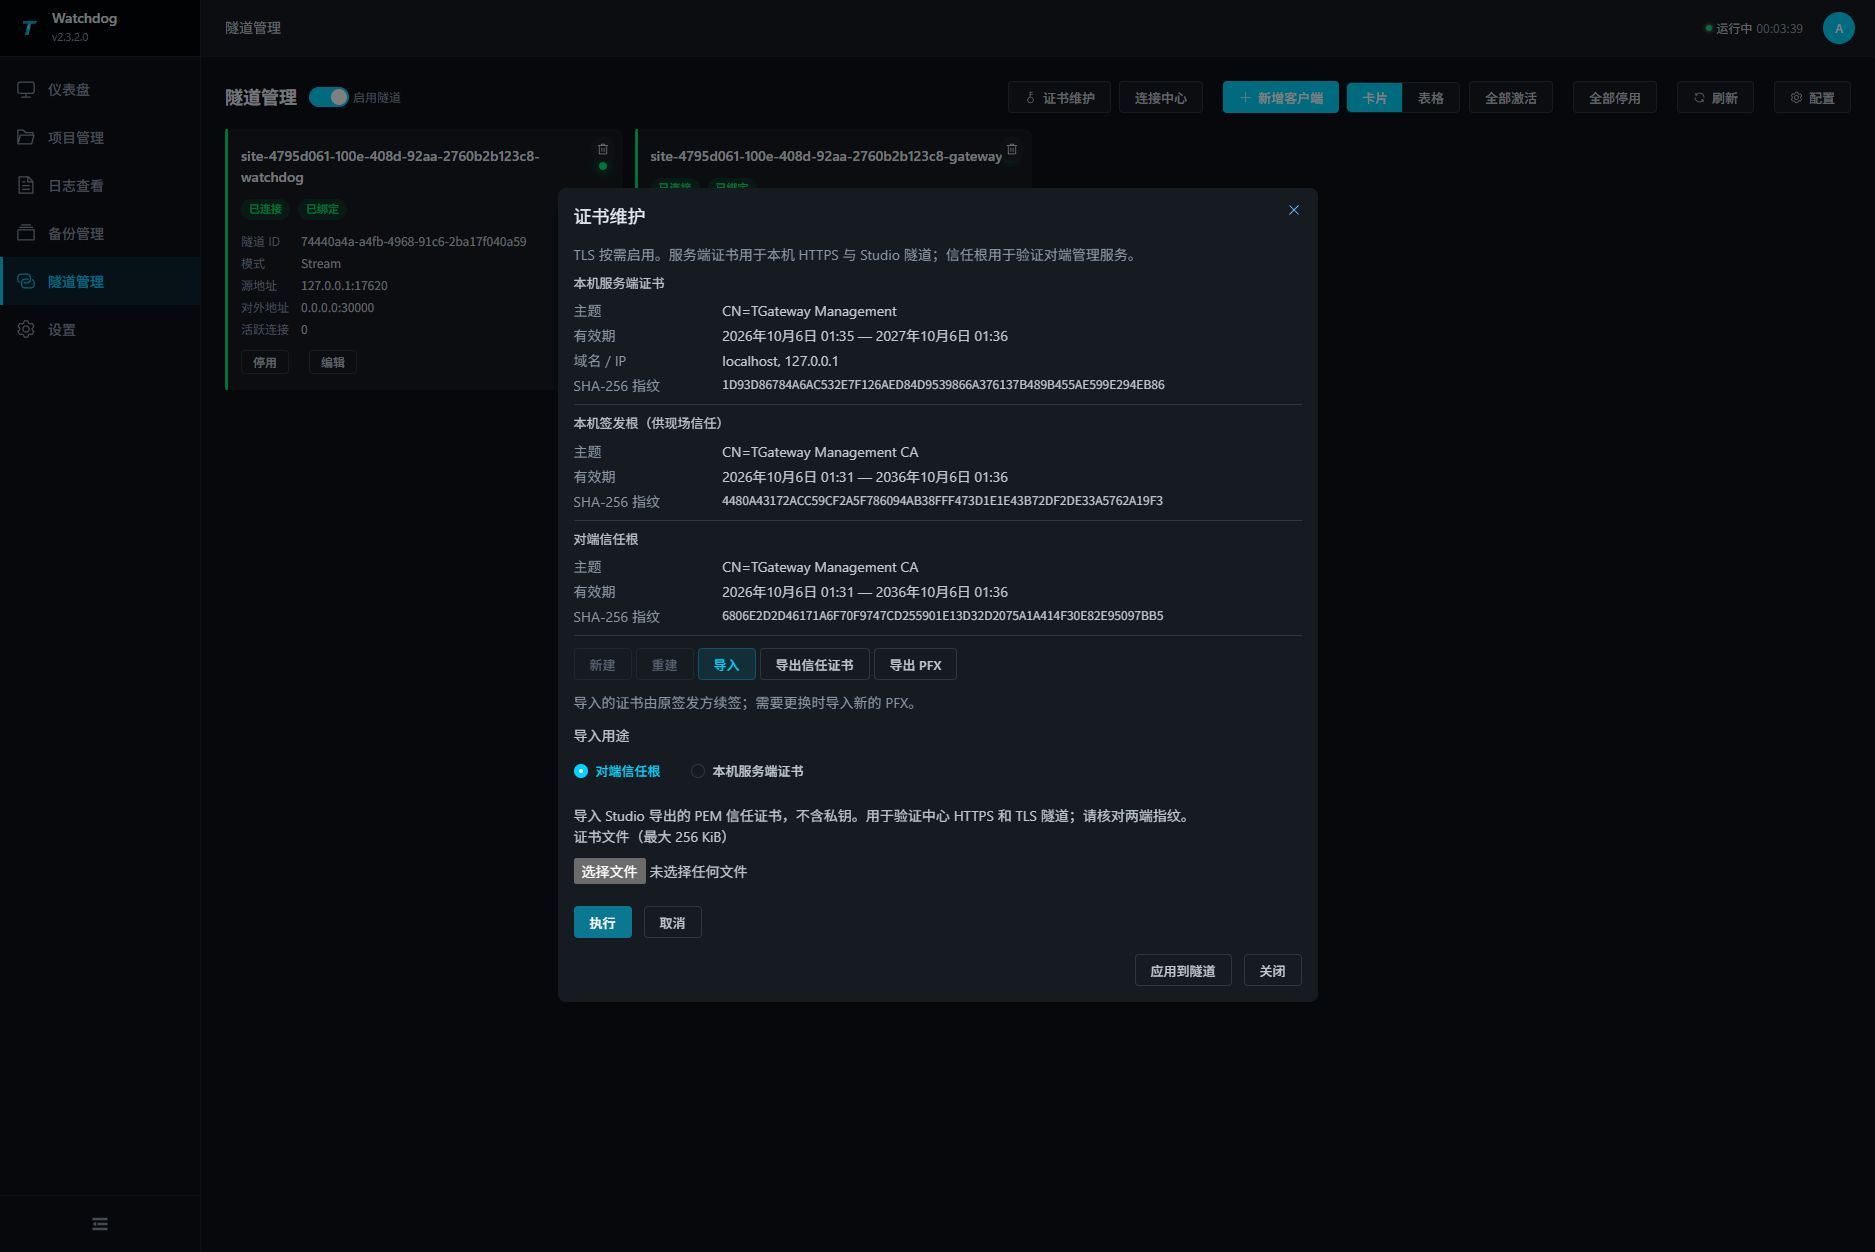
For Studio to validate private-CA Watchdog HTTPS, give Watchdog its own server identity, export its public CA, and import that CA into Studio as the trusted peer CA. Do not distribute the Studio server private key to sites.
Each host currently accepts one trusted root. A subsequent import replaces it. For multiple sites, issue separate server identities from a common management CA.
Add an HTTPS listener
Certificate maintenance stores the identity. Initial HTTPS setup also requires a listener configuration and host restart:
- Create or import the local server identity through the existing HTTP page. Back up
appsettings.jsonin the installation directory. - Merge the following
Kestrelobject into the JSON root, preserving authentication, Jwt, WatchdogOptions and other settings. Edit an existingKestrel.Endpointsobject instead of creating duplicate keys or replacing the file. - For Studio, this example retains HTTP
5100and adds HTTPS5101:
{
  "Kestrel": {
    "Endpoints": {
      "Http": { "Url": "http://0.0.0.0:5100" },
      "Https": { "Url": "https://0.0.0.0:5101" }
    }
  }
}
- In Watchdog's own file, use the same structure with HTTP
6200and HTTPS6201. These HTTPS ports are examples, not pre-existing listeners. Do not specify another endpoint certificate when using the maintained identity. - Allow the HTTPS port and restart the corresponding host. Access it using a name covered by the certificate, such as
https://center.example.com:5101, and verify sign-in. - Only after the new endpoint and trust work, update site protocols and ports in Studio or the center address used by the site. Handle the original HTTP listener according to network policy.
Service arguments, environment variables and explicit endpoint certificates can affect the effective configuration. Browser trust is configured separately; importing application trust does not update the OS or browser trust store.
Enable management tunnel TLS
- Ensure Studio has a server identity and the site's Watchdog trusts its issuing CA.
- In Studio Tunnel, save and start/apply the TLS Broker configuration; see Tunnels.
- New enrollment can bring the center connection settings into Watchdog. Update existing Watchdog clients to TLS, save and reconnect. Both ends must use the same mode.
- After replacing certificates, select Apply to tunnels for running TLS tunnels. Verify that both Watchdog and Gateway mappings are connected and bound after reconnection.
Renew identities or replace a CA
| Task | Sequence |
|---|---|
| Renew a locally issued identity | Rebuild, check names and validity, apply to tunnels, then restart the host for HTTPS. The existing CA is retained. |
| Renew an externally issued identity | Obtain a new identity from the issuer, import its PFX, apply to tunnels and restart the host. |
| Replace the management CA | Prepare identities, trust at both ends and a working maintenance channel; switch during a maintenance window and verify each site. |
Verify HTTPS sign-in and tunnel connections separately. Maintain data-plugin certificates in Gateway's certificate management.
Import, export and activation
| Operation | Behavior |
|---|---|
| Export PFX | Requires a 12–128 character export password. Contains the server private key and public root, but no CA signing key. |
| Import server identity | Accepts PFX/P12 with one server private key and its directly signing root CA. Intermediate CA chains are not supported. |
| Import trusted CA | Accepts a single valid self-signed public PEM root, without private keys. Maximum file size is 256 KiB. |
| Apply to tunnels | Reconnects running TLS tunnels. Stopped tunnels remain stopped. |
| HTTPS identity change | Requires a Studio or Watchdog host restart. Does not create an HTTPS listener. |
| Browser trust | Is not changed by this panel. Use your organization's browser and OS trust deployment process. |
Keep exported PFX files and their passwords separately. A server PFX backup does not preserve local CA signing capability; a full host migration must preserve certificate storage and its access permissions. Keep a recovery path for HTTPS-only hosts. Invalid identities cause HTTPS handshakes to fail; an existing HTTP maintenance listener can still be used to repair the identity.
Troubleshooting
| Symptom | Action |
|---|---|
| Invalid file or password | Check the import purpose, password, validity and size. Failed validation leaves the current identity intact. |
| Rebuild unavailable | Obtain a renewed PFX from the original issuer. |
| HTTPS still presents the old certificate | Restart the corresponding host and establish a new connection. |
| Configuration changed | Reopen the panel, review the current configuration and retry. |
| Hostname mismatch | Correct the certificate names or connection address. Keep validation enabled. |
| Connected but not bound | Check exposed port conflicts, access keys and tunnel logs. |
See site management for enrollment and tunnels for manual tunnel configuration.