Center and edge deployment
This guide takes one center and one edge site through deployment: the edge Gateway collects device data, the center Gateway aggregates it, and Studio manages projects and remote maintenance. Start with one site and one test variable before adding more sites and points.
Follow this sequence for the first deployment:
Install services → Enroll the site → Publish and verify collection → Select variables → Configure synchronization → Verify.
The main procedure uses Studio to configure SyncBridge automatically. Choose an MQTT route before starting if required. Management HTTPS, manual configuration and ongoing maintenance appear in the optional sections.
Before deployment: roles, network and accounts
What to install at each location
| Location | Package and purpose |
|---|---|
| Center management host | Studio: save and edit projects, register sites, publish projects and configure synchronization. |
| Center data host | Watchdog with Gateway: Watchdog supervises the process; Gateway continuously receives site data. It can share a machine with Studio using separate directories, processes and non-conflicting ports. |
| Each edge site | Watchdog with Gateway: Watchdog receives projects and supervises the process; Gateway collects local devices and sends data to the center. |
Complete two separate connections: management enrollment lets Studio maintain the site; data synchronization brings site variables into the center Gateway. An online site in Studio confirms management access only.
Run the center Gateway independently. Studio's project runtime is for development and changes when projects are switched, so it should not be the continuously running aggregation service.
Choose one data route
| Site requirements | Route to use |
|---|---|
| Both ends are TGateway; synchronize point configuration and latest values | SyncBridge: follow steps 1–6 and select SyncBridge in step 5. No external Broker is needed. |
| Both ends are TGateway; use MQTT and allow an inbound listener at the center | Automatic GatewayMqtt: follow steps 1–6, selecting GatewayMqtt in step 5. No external Broker is needed. |
| An MQTT Broker already exists, or both Gateways can only make outbound connections | Complete steps 1–4, follow shared Broker setup, then return to step 6. |
Start with one route for the same variables to make sources and failures easy to identify. For custom JSON from third-party devices, first collect it into local variables, then include those variables in the synchronization scope.
Prepare endpoints and credentials
Examples use center.example.com for the center and 192.168.10.20 for the site. Replace them with actual reachable names or IPs. Screenshot values such as localhost and high ports belong to a same-machine example.
| Endpoint | Example and access direction |
|---|---|
| Studio Web / API | http://center.example.com:5100; used by the operator browser and by Watchdog during outbound enrollment. |
| Center Watchdog | http://center.example.com:6200; used to inspect and maintain the center Gateway process. |
| Center Gateway Web / API | http://center.example.com:6100; Studio uses it to configure the center. |
| Site Watchdog | http://192.168.10.20:6200; Studio connects directly or through a management tunnel. |
| Site Gateway Web / API | http://192.168.10.20:6100; the browser and Studio connect directly or through a management tunnel. |
| Studio tunnel Broker | Center port 7789; needed for outbound enrollment, initiated by the site Watchdog. |
| Exposed management ports | Enrollment creates separate Watchdog and Gateway mappings. Allow the ports actually assigned. |
| SyncBridge data port | For example, center 7777; the site Gateway connects to it. Configure it separately from tunnel ports. |
| Gateway MQTT data port | For example, center 1883; used only by the MQTT route. A TLS listener may use 8883, but a port number alone does not enable TLS. |
Allow traffic in the directions above. Reverse management tunnels work for sites without public inbound management access; the site must still reach Studio, its tunnel Broker and the selected data port.
Prepare three account types: a Studio account for center management, Watchdog accounts for site registration and deployment, and Gateway accounts for collection and synchronization configuration. Use each host's own credentials; Watchdog and Gateway passwords are separate.
If management HTTPS or tunnel TLS is required, complete management encryption before enrollment. To encrypt data only, enable Use TLS in step 5.
1. Install and start the center and site
Where: center management host, center data host and site gateway computer.
- Download matching OS and CPU packages from Downloads: Studio for management, and Watchdog with TGateway for the center data host and site. Use the same current release at both ends.
- Follow Quick start for runtime prerequisites. Extract complete packages and start Watchdog at the center and site, keeping the included
GatewayAppdirectory. - Start
TGateway.Studio.exeon Windows or./TGateway.Studioon Linux from the complete Studio directory. Open its actual listener, typicallyhttp://center.example.com:5100. - Sign in to both Watchdogs. Confirm Gateway is running on the dashboard, then open each Gateway using its actual API port. Use delivered credentials; default-account and initial setup instructions are in Quick start.
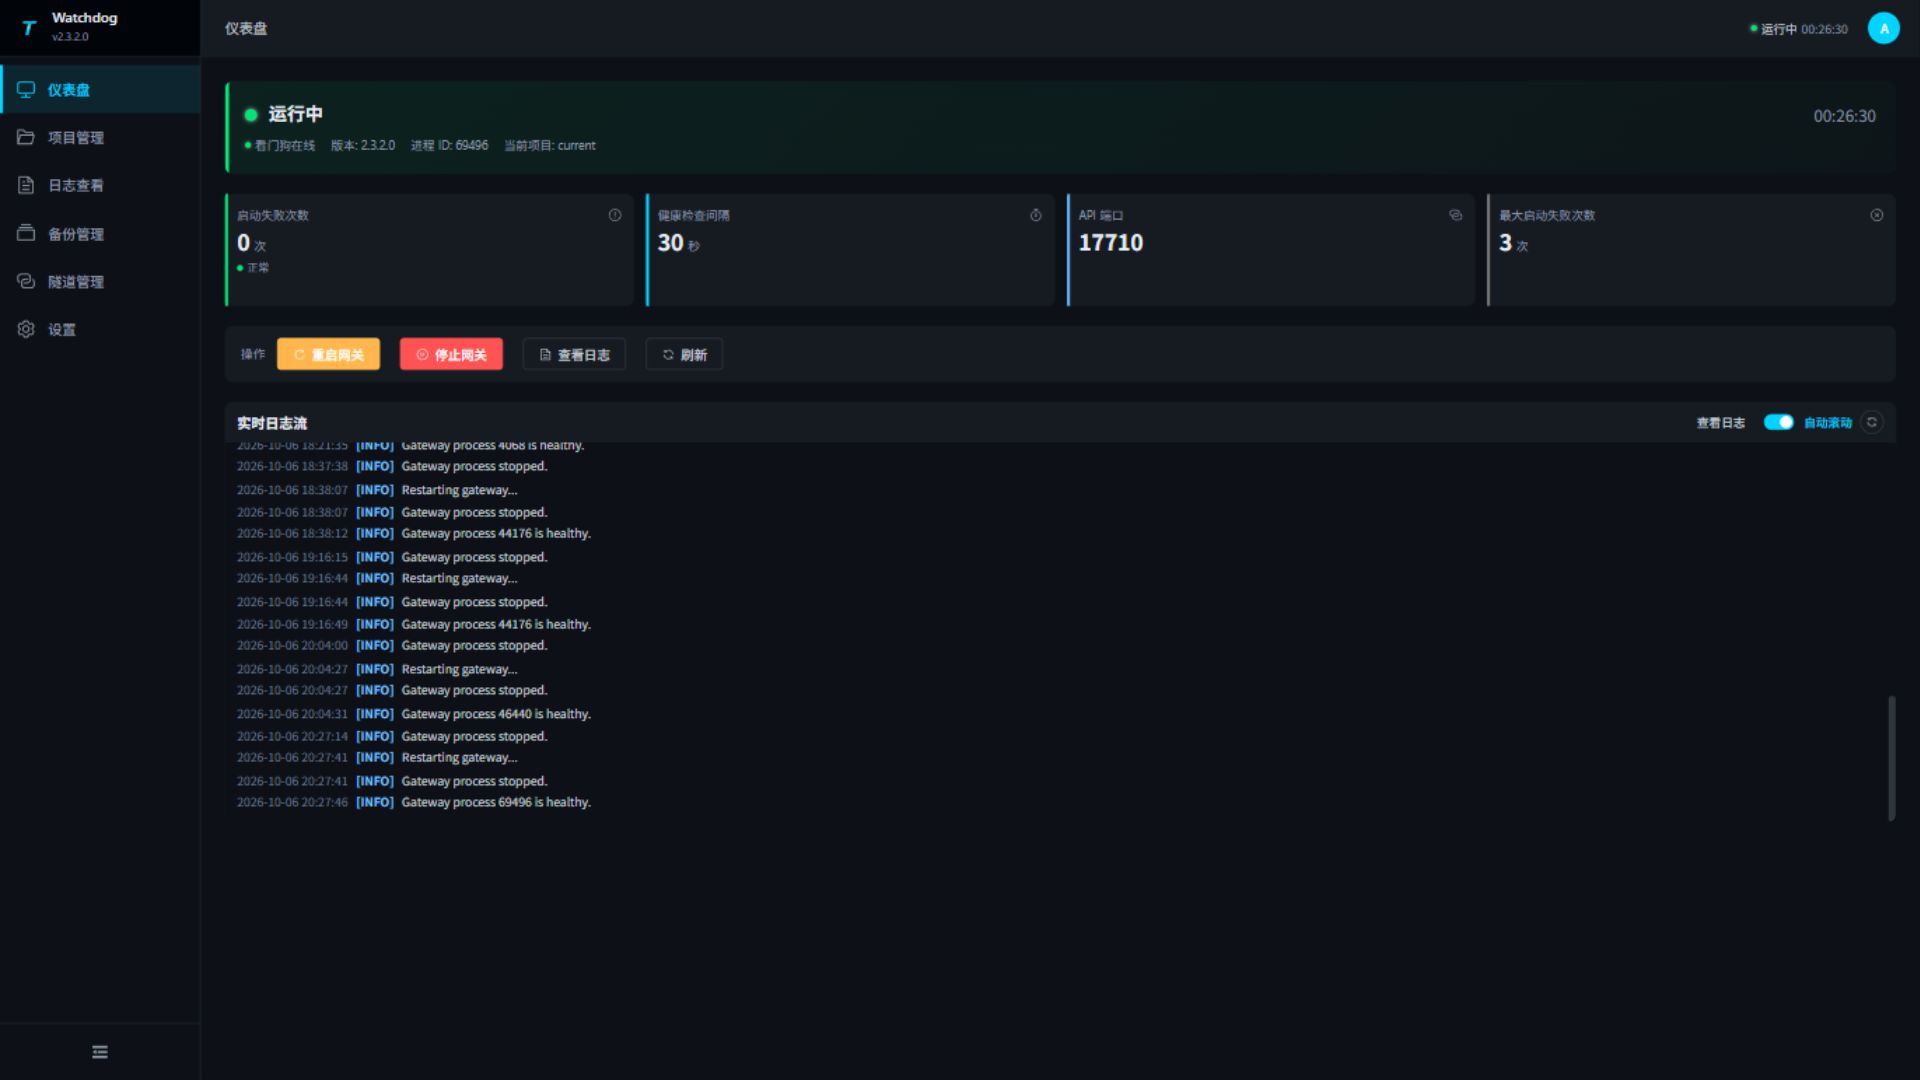
- Once startup succeeds, configure Watchdog to start as a service using Quick start. Keep Studio running under the center's service manager too. Run one host instance per installation directory.
Complete when: Studio and both Watchdog/Gateway pairs are accessible, both Gateway processes are stable, and failure counts are not continuously increasing.
2. Establish Studio management access
Where: center Studio; outbound enrollment also requires the site Watchdog.
Open Site management in Studio and choose one connection method.
Option A: direct LAN or private-network access
Use this when Studio can reach the site Watchdog and Gateway directly.
- Select Add site and Direct LAN for the maintenance connection.
- Enter the site name, group, Watchdog host, port and Watchdog credentials. Enter the host and port separately.
- Set the actual site Gateway port. HTTPS switches must match existing listeners; selecting them does not create remote HTTPS services.
- Save and select Test, then continue with the management checks below.
Option B: the site initiates a connection to the center
Use this when the site can reach the center but the center cannot directly reach site management ports.
- In Studio, open Tunnel and configure the Broker port, verification token and optional access key. Choose TCP or TLS, save and start the Broker. See Tunnels for the fields.
- Return to Site management → Add site and select Edge connects to center. Enter the reachable center host, actual site Watchdog and Gateway ports, and Watchdog credentials. Enter only a hostname or IP for the center host.
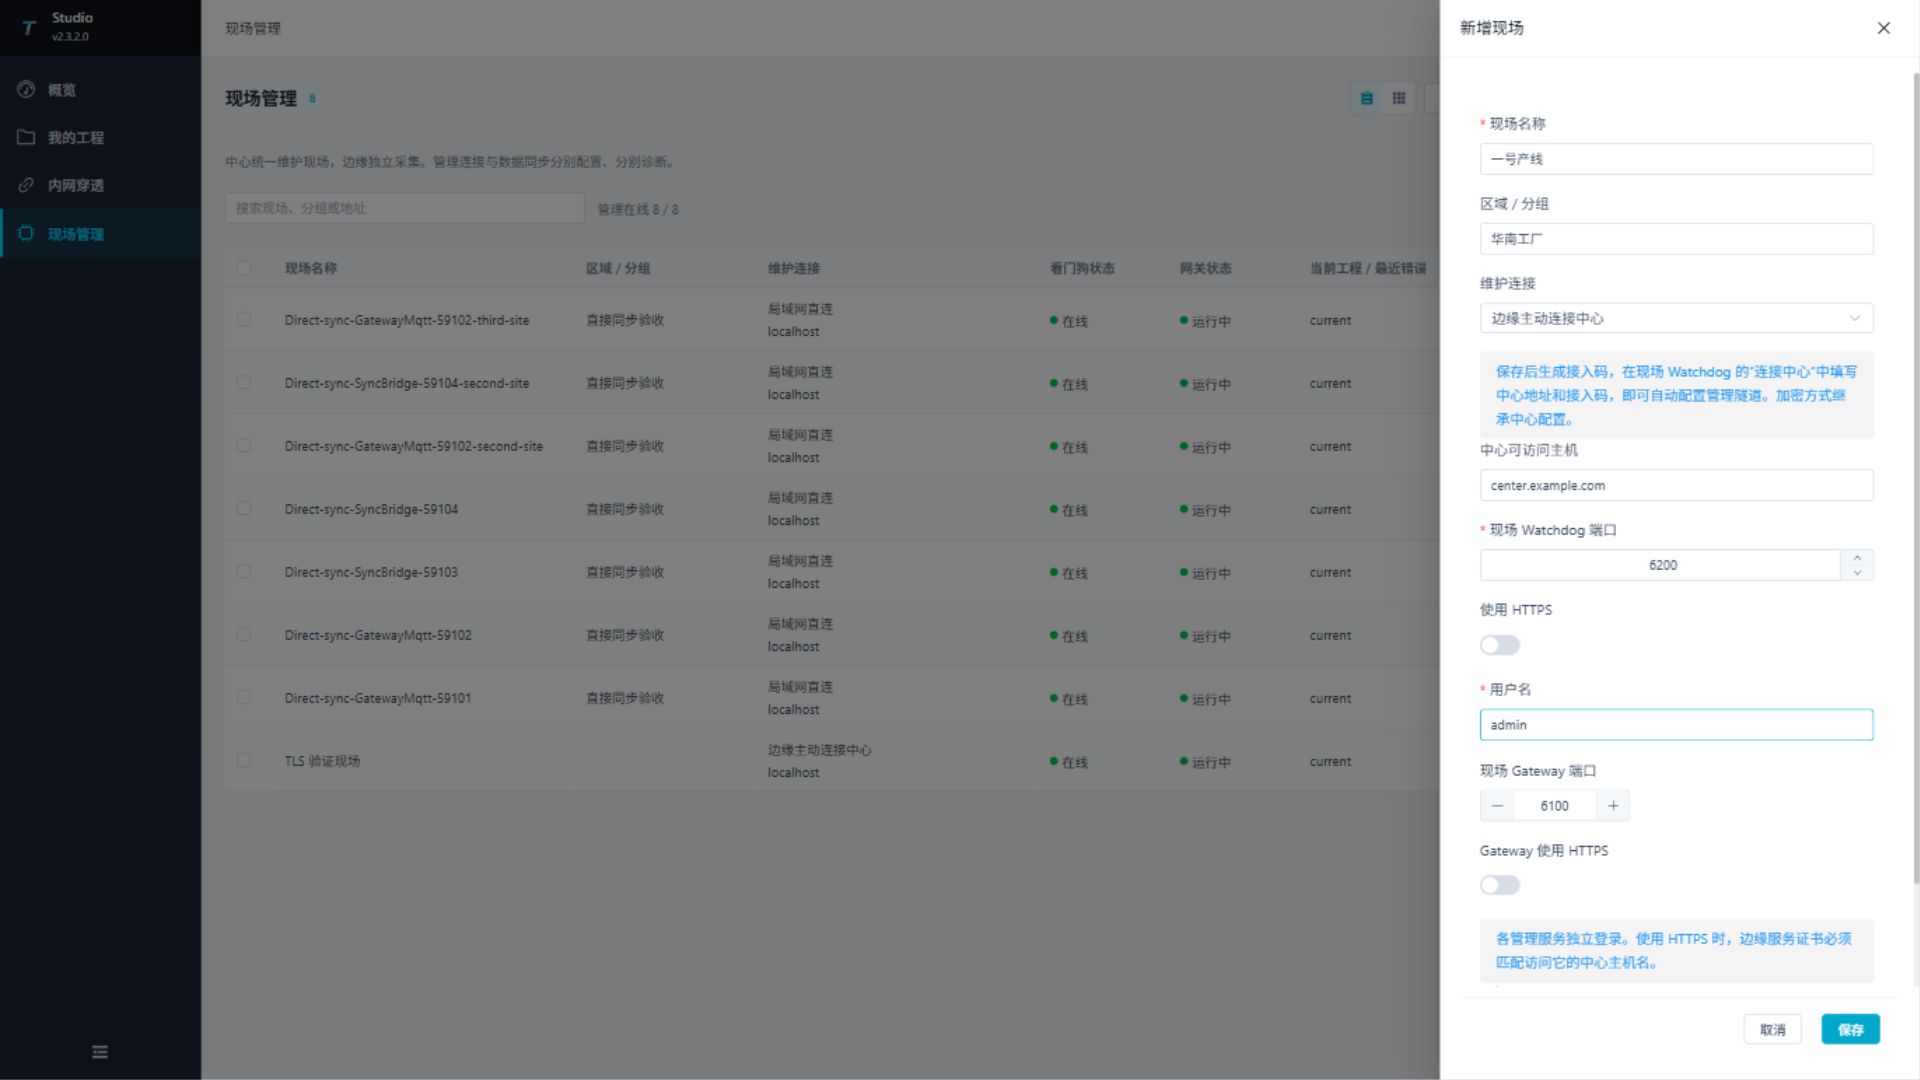
- Save, then select Generate enrollment code from the site's operations. Check that the displayed Studio URL is reachable from the site.
- In site Watchdog, open Tunnel management → Connect to center. Enter that HTTP/HTTPS URL and enrollment code, then select Enroll and connect.
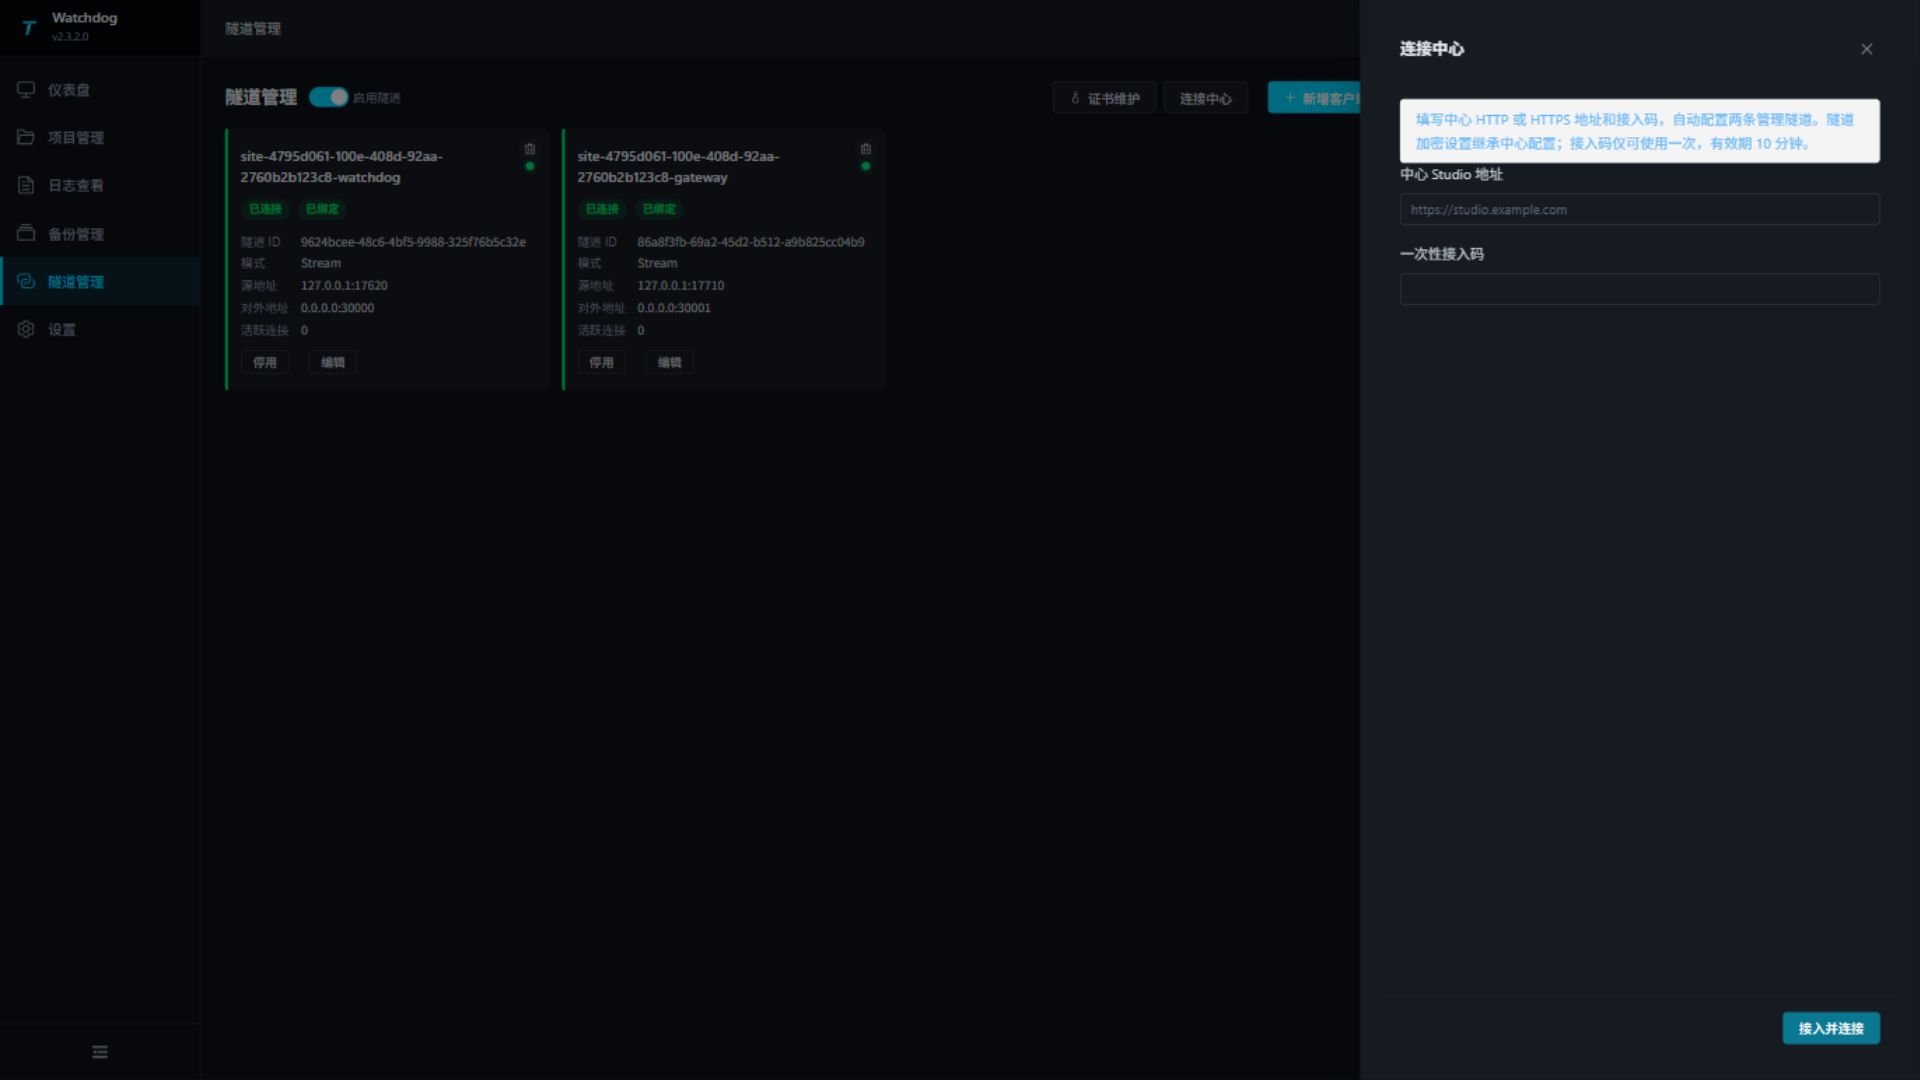
- Wait until both Watchdog and Gateway tunnels are connected and bound. Check local and exposed ports and allow the assigned center ports.
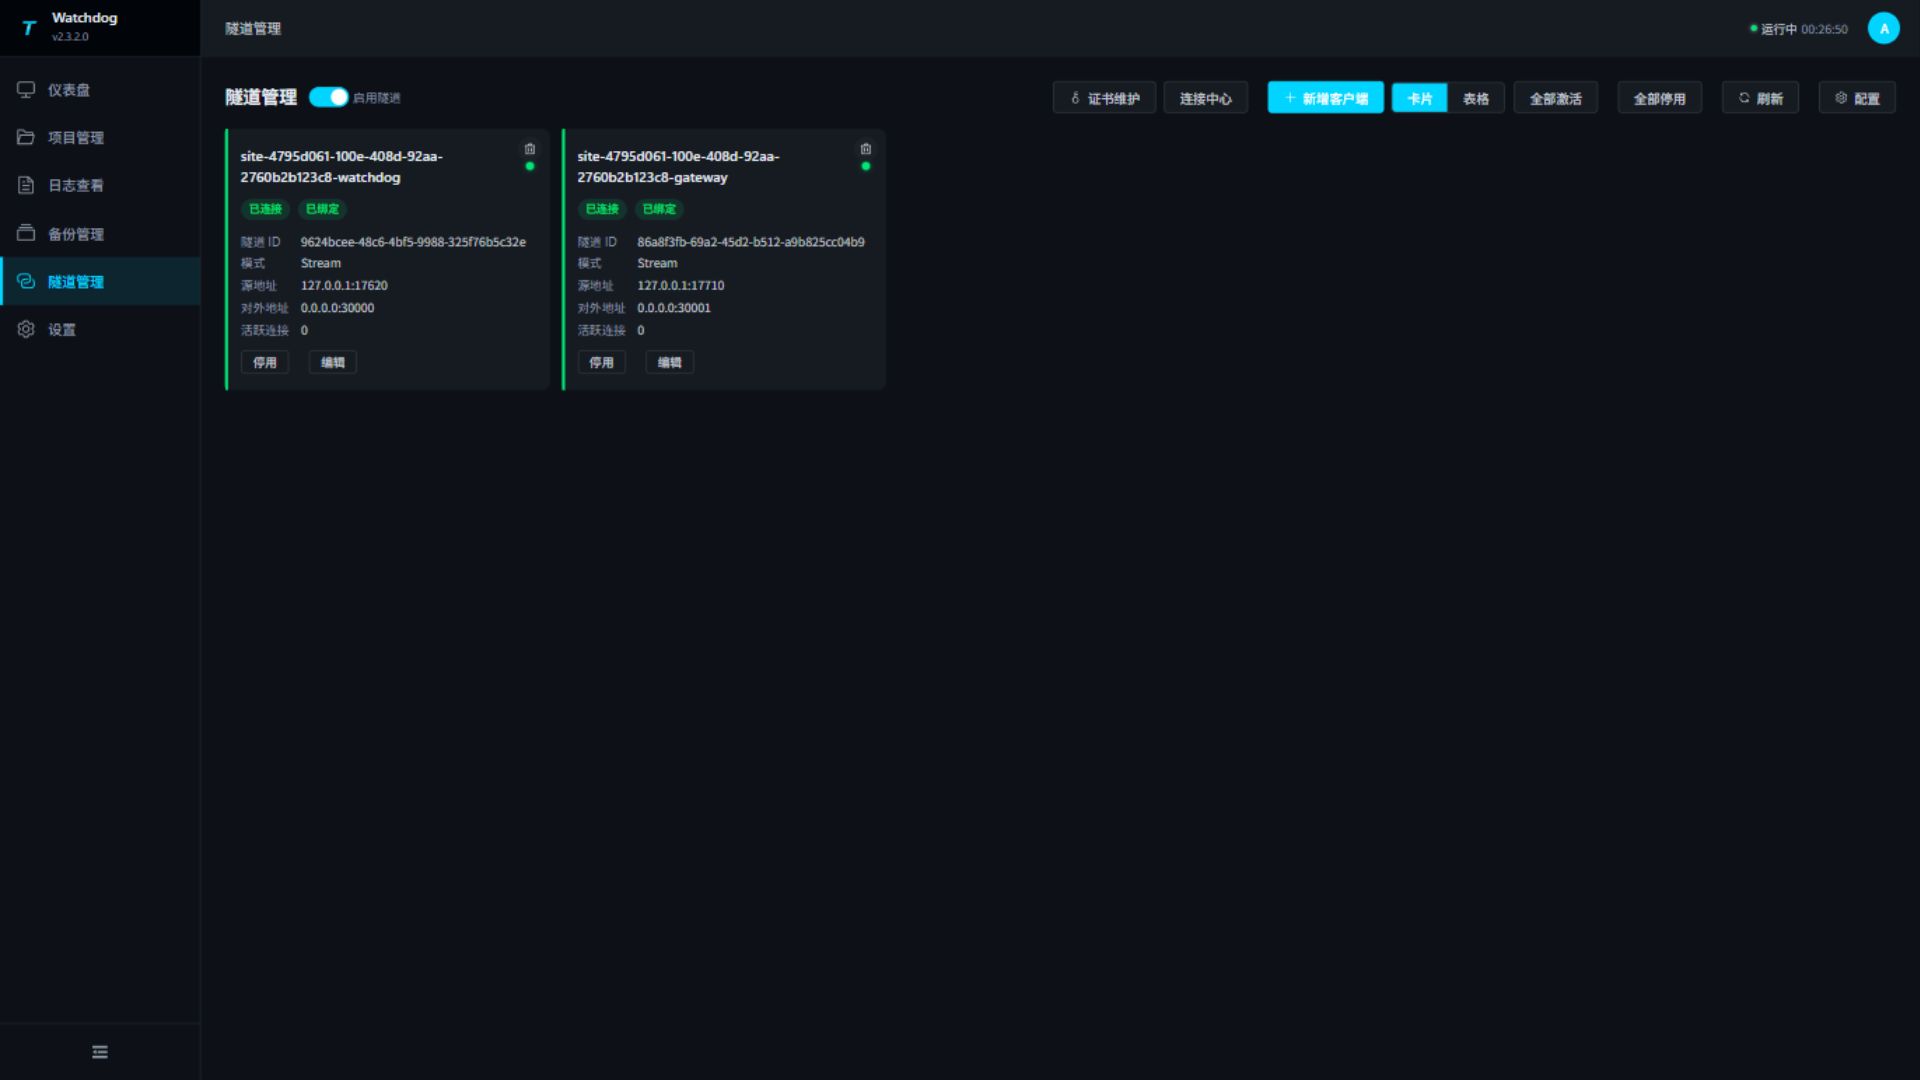
Codes expire after 10 minutes and can be used once. Regenerating a code, editing or deleting the site, or restarting Studio invalidates unused codes. Generate another if needed.
Check management access
In Studio, select Test for the site and confirm Watchdog is online and Gateway is running. Open Gateway interface and Operations → Site maintenance, sign in with their respective accounts, and confirm both belong to the intended site.
Complete when: Studio opens the correct site's Gateway and Watchdog. Continue by preparing its collection project.
3. Publish the project and verify site collection
Where: Studio prepares and publishes the project; site Gateway verifies device data.
If an existing site already collects correctly, check the completion criteria below and proceed to step 4. To archive current site changes, use My projects → Download from gateway before later deployment so an older local project does not overwrite them.
Prepare collection in Studio
- Open My projects → New project and give it a site-specific name. Use Import project for an existing ZIP.
- Start the project's runtime and open Gateway Web.
- In Development configuration → Collection configuration, create a channel with the site's IP/port or serial parameters. Create a device, select its collection plugin and set its station address and other properties.
- Add one test variable with the documented address, data type, permissions, collection period and byte order. Save and enable it. Plugins with their own connections keep connection parameters in device properties; see Collection configuration.
Without a PLC, use the Modbus simulator in Collect your first point. If the center cannot reach the real site PLC, prepare the settings here and verify actual collection after deployment.
Upload to site Watchdog
- If the site already has a project, create a backup in its Watchdog Backup management.
- Select Upload on the Studio project and choose the site tested in step 2.
- Set the target runtime identifier, such as
win-x64,linux-x64orlinux-arm64, to match the site's OS and CPU. - Select Update RUNTIME for initial deployment or a Gateway program update. For configuration-only releases, follow the release plan. Use Force NuGet restore only when dependencies need restoring again.
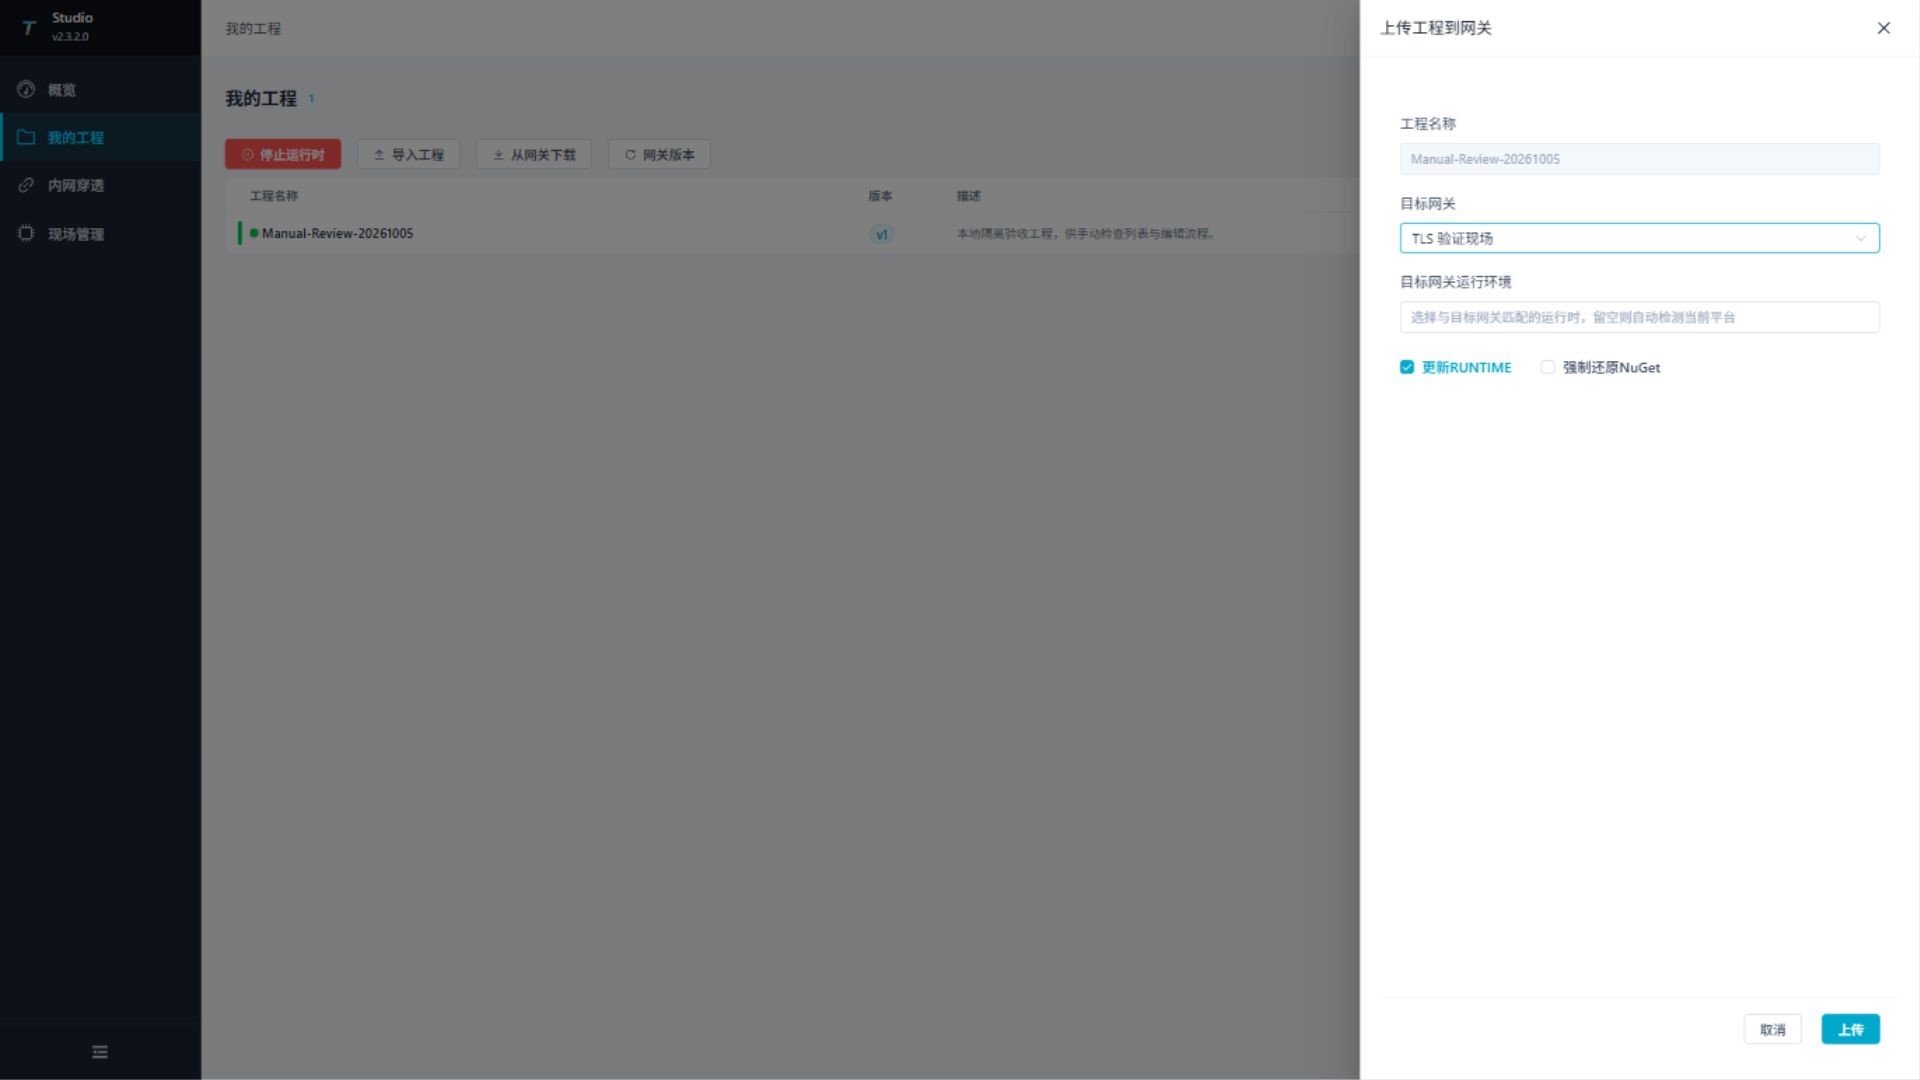
- Upload and wait for completion. In site Watchdog, check the active project, Gateway version and process logs. Open site Gateway and inspect the test variable.
Upload can restart the supervised Gateway; use an allowed interruption window. See Project management for complete parameters, or upload and apply a full package through Watchdog project management.
Complete when: site Watchdog runs this project and the test variable is healthy and matches the device. Record its name, value and update time for the center comparison.
4. Select the site variables to synchronize
Where: site Gateway → Development configuration → Data forwarding.
- Add and enable a forwarding group, for example Center aggregation.
- Choose manual variable selection. Add and enable the healthy test variable from step 3.
- Choose the required trigger, such as change-triggered sending; set the period for timed sending. For Gateway MQTT, disable Online Filter so snapshots include offline variables and metadata.
- Save the group. See Data forwarding for complete scope and trigger settings.
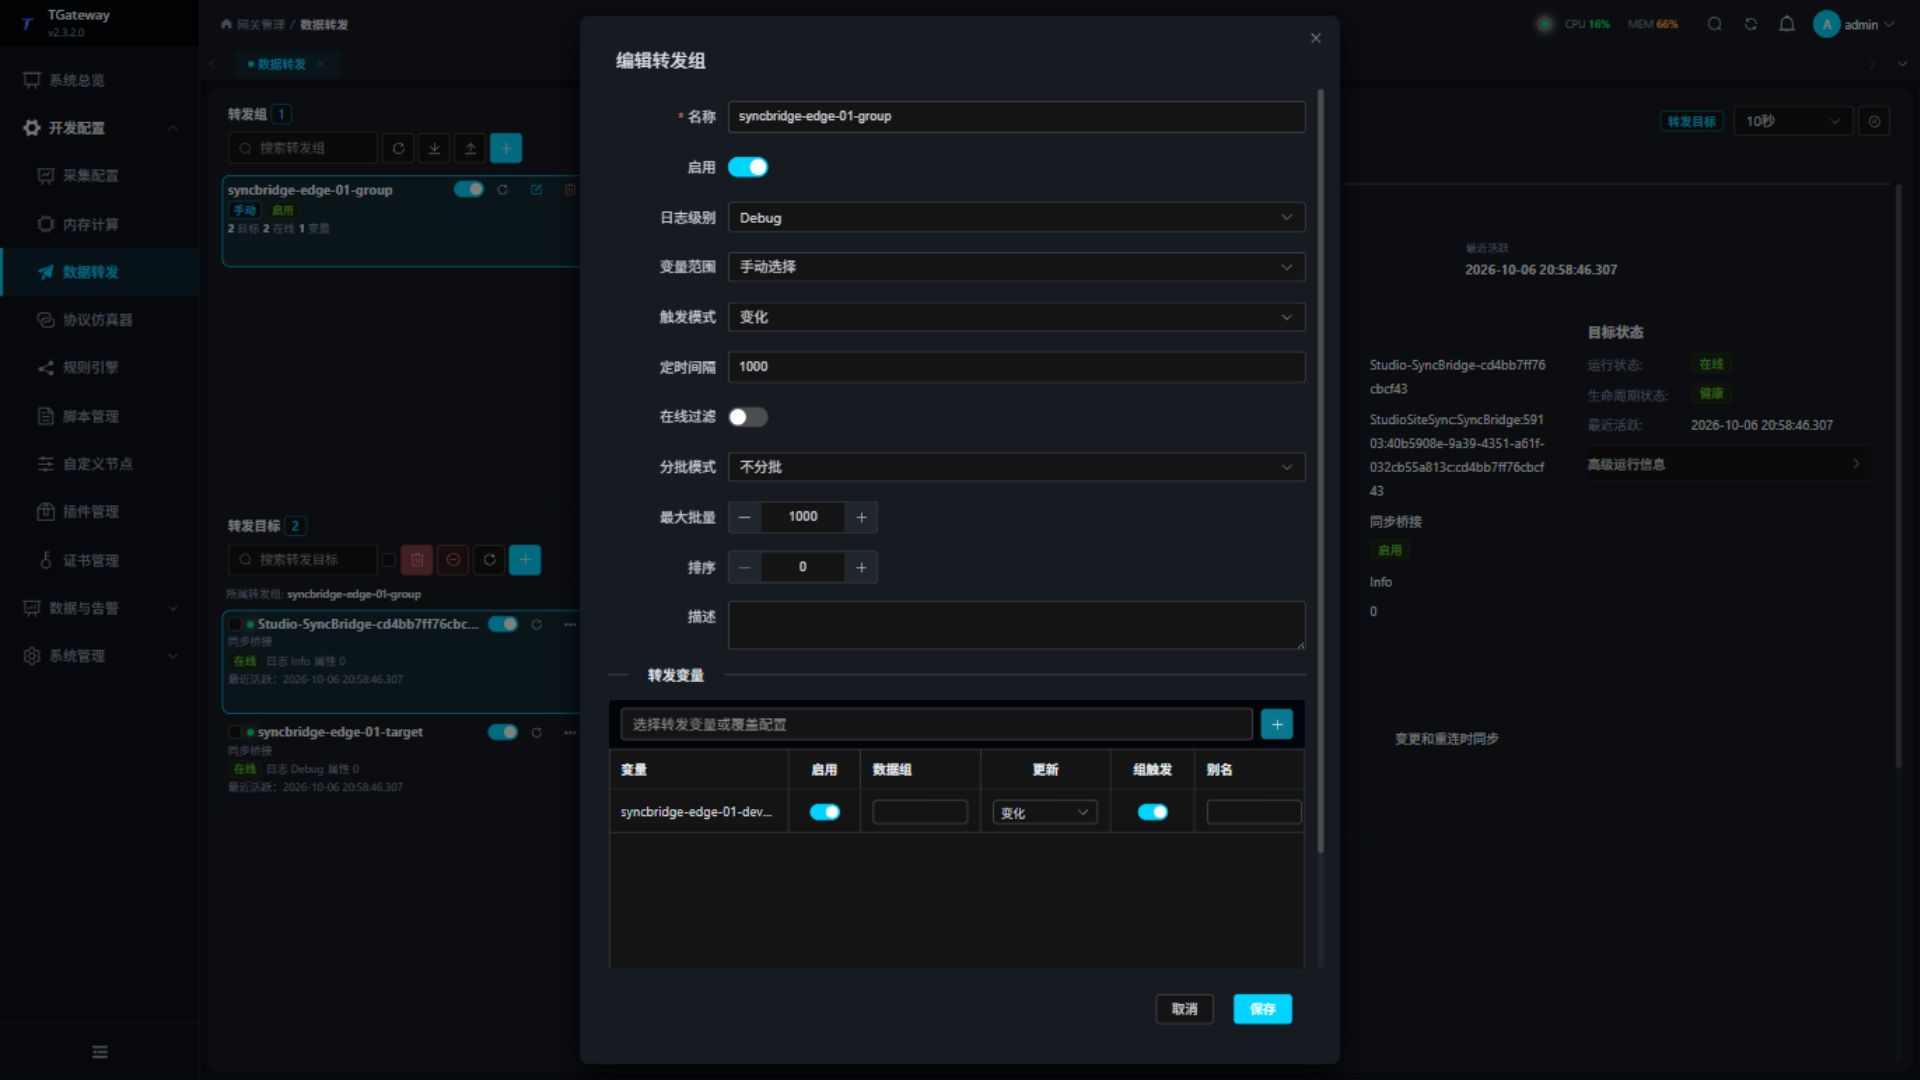
Complete when: an enabled site group contains the test variable. Studio uses this scope without adding all site variables; it creates the synchronization target in the next step.
5. Configure and enable synchronization in Studio
Where: center Studio → Site management → target site → Data synchronization.
Enter both endpoint configurations
| Field | What to enter |
|---|---|
| Center Gateway management URL | The independent center Gateway URL, such as http://center.example.com:6100, used to sign in and configure it. |
| Center Gateway credentials | The center Gateway account with configuration permissions. |
| Site Gateway management URL | Read from site registration. If incorrect, close the panel and edit the site first. |
| Site Gateway credentials | The site Gateway account. |
| Synchronization mode | Select SyncBridge for this procedure. For MQTT, select GatewayMqtt and recheck the data port. |
| Center data host | A center hostname/IP reachable by site Gateway, such as center.example.com; omit scheme, port and path. |
| Center data port | For example, 7777 for SyncBridge or 1883 for GatewayMqtt. Use an available port or reuse an existing listener for the same protocol at this center. |
| Use TLS | Follow network policy; disabled by default. When enabled, Configure and enable prepares and installs the data certificates automatically. |
Studio uses management URLs to configure the two Gateways; site Gateway uses the data host and port to send data. These may use different network addresses, but each must be reachable by its caller. Do not enter Studio, Watchdog or tunnel Broker ports here.
Connect, select the group and apply
- Select Connect both ends and wait for sign-in checks. This reads the site's enabled forwarding groups.
- Select Center aggregation from step 4. If the list is empty, save and enable the site group, then reconnect.
- Check protocol, port, TLS and group, then select Configure and enable. Login passwords are used only for this operation and cleared when the panel closes.
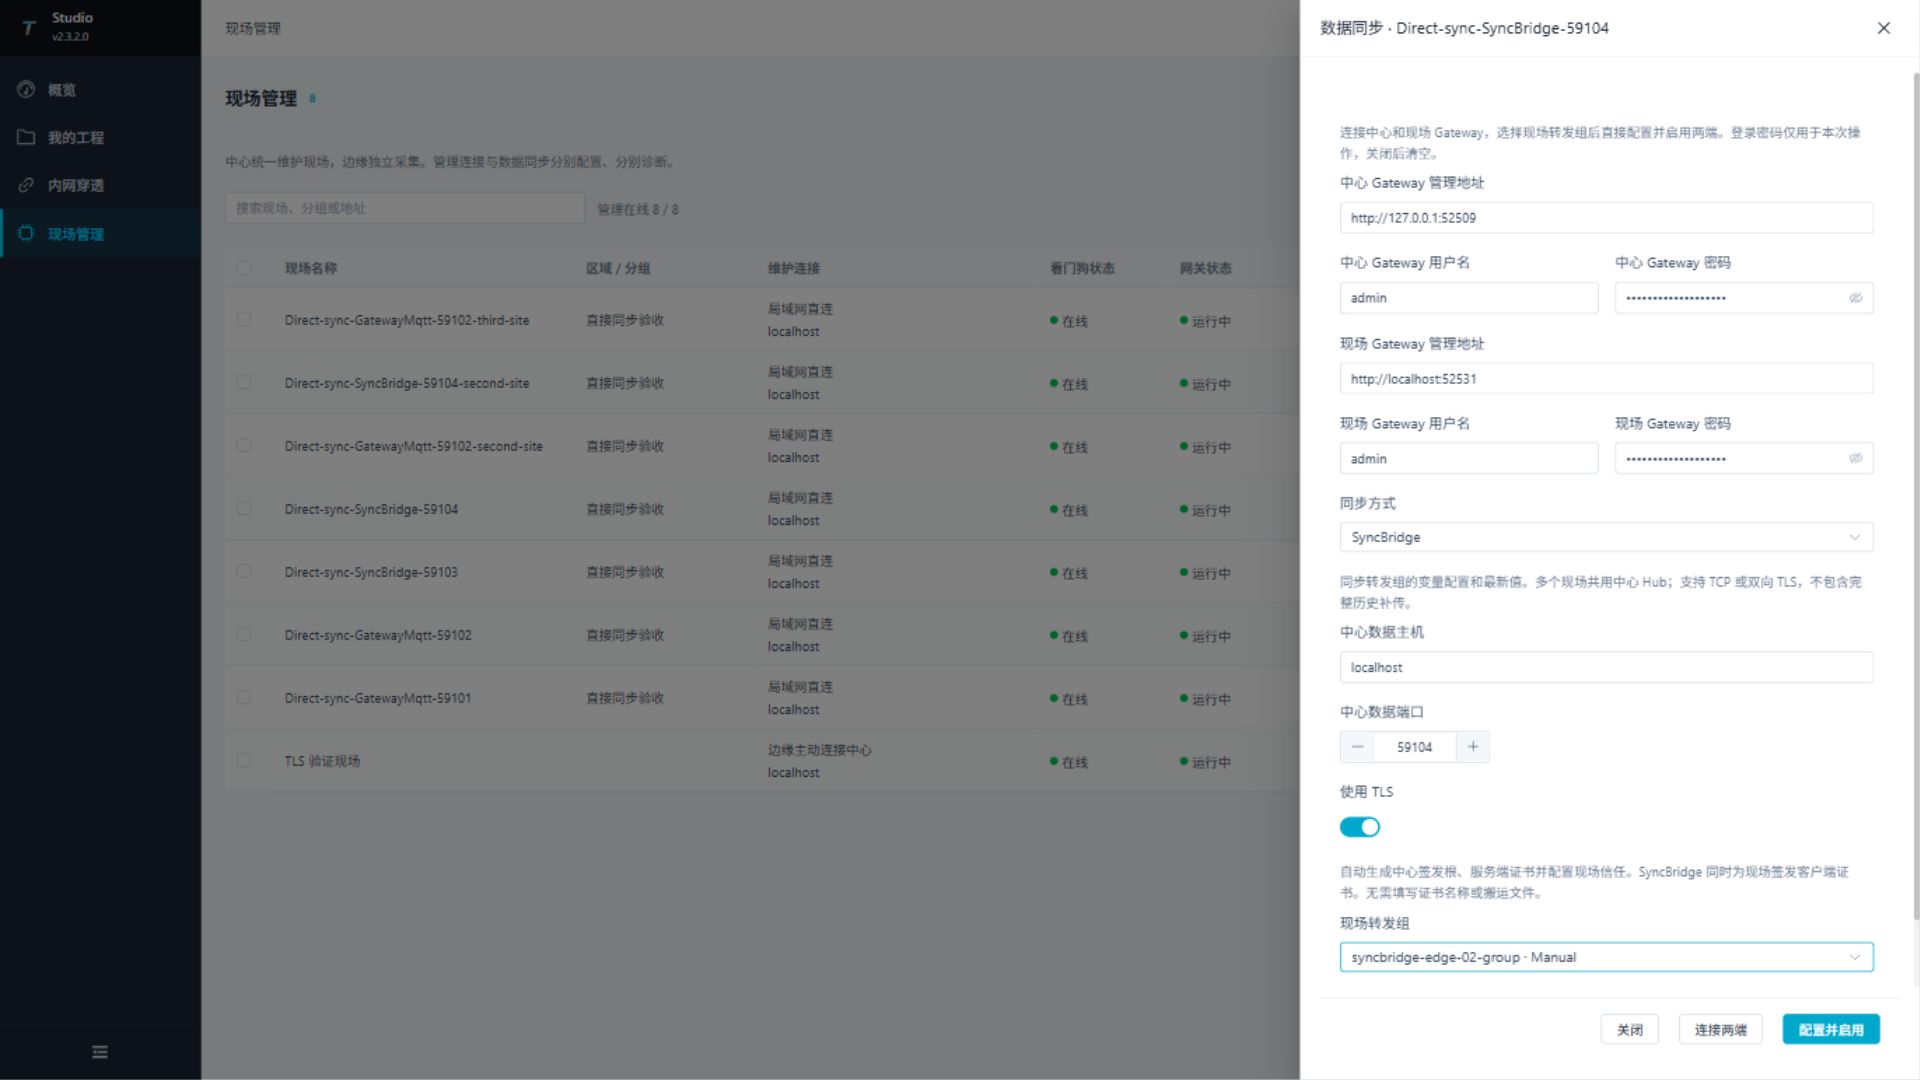
- Wait for Configuration saved at both ends; data connection confirmed. If synchronization is pending or a stage fails, inspect that stage, fix its error and retry with the same parameters.
Successful automatic setup creates the center receiver, site sending target and center mirror variables. New links disable remote writes. GatewayMqtt also configures site offline caching and applies center variables after the first snapshot; check that its Center variables stage completes.
Multiple sites can share a center listener with the same protocol, port and TLS mode. Repeated setup reuses objects and credentials. Failures may leave completed stages in place, so inspect and retry without repeatedly changing names. Keep TLS mode consistent on a shared port; use another port or a coordinated maintenance window to change it.
Complete when: Studio confirms the data connection. Verify actual values in step 6. Automatic certificate issuance does not include renewal; see Data encryption.
6. Verify with one test variable
Where: site Gateway and center Gateway.
- At the site, find the test variable from step 3 and check its value, status and update time.
- Check the selected route at the center:
| Route | Center checks |
|---|---|
| SyncBridge | In Development configuration → Data forwarding, select the center SyncBridge target and open Debug → SyncBridge protocol debug. The peer is connected, its configuration revision is acknowledged, and mirror devices and variables appear in collection. |
| Gateway MQTT | In Development configuration → Collection configuration, select the aggregation device and open Device debug → Protocol debug. The source is online, its catalog contains variables, the snapshot succeeds, and variable synchronization has been applied locally. |
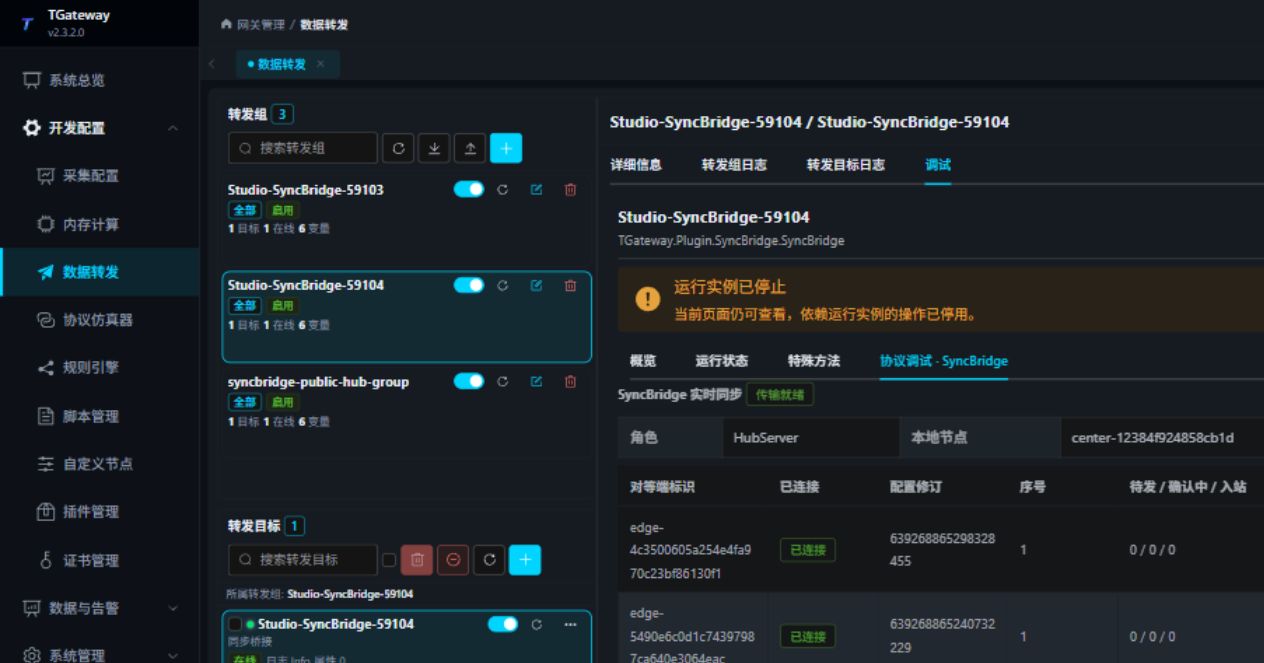
- Find the matching source variable in center collection and compare value, status and update time with the site.
- Change an approved test point through the device or simulator. Wait for collection and forwarding, then confirm the center follows the change. Do not write to unauthorized production points.
- Confirm both supervised processes are stable and the site forwarding target is online. For MQTT, also check that offline cache is not continuously growing.
Pass criteria: management access works, site collection is healthy, and the center follows a real value change. Then expand the forwarding scope to the remaining business variables.
SyncBridge manages its mirrors automatically. They need no collection channel and cannot be manually deleted or assigned another plugin; maintain source settings in the synchronization target. Latest-value recovery is not complete historical backfill. Configure storage and queries and persistence separately when needed.
Optional: HTTPS and TLS
Encrypt management connections
| Connection | Where and when to configure |
|---|---|
| Browser / Studio to Watchdog HTTPS | Prepare the Watchdog server identity and HTTPS listener; configure Studio and browser trust separately before enrollment. |
| Browser / Watchdog to Studio HTTPS | Prepare the Studio server identity and HTTPS listener; configure Watchdog and browser trust before generating an enrollment code. |
| Watchdog to Studio tunnel | Enable TLS on both Broker and client; Watchdog trusts the center CA. |
| Browser to Gateway HTTPS | Provide an independent HTTPS endpoint, such as a controlled reverse proxy, then use its management URL. Data-plugin certificates do not enable Web HTTPS. |
Follow Management certificates: prepare identity → import peer trust → enable HTTPS or tunnel TLS → verify the endpoint → update site URLs. That page includes listener configuration and renewal.
Tunnel TLS covers the site-to-center tunnel. Browser access to an exposed mapping still needs HTTPS separately. Certificate names must match actual connection names, and machine clocks must be correct.
Encrypt data connections
With Use TLS enabled in step 5, Studio configures data certificates in both Gateways:
| Mode | Automatic result |
|---|---|
| SyncBridge | Center CA, server identity, separate client identity for each site and site trust, using mutual certificate verification. |
| GatewayMqtt | Center CA, server identity and site trust; each source has its own ClientId and credentials. For client-certificate fingerprint binding, follow the server manual. |
Inspect certificates in each Gateway's Development configuration → Certificate management. The CA private key stays at the center. Each site receives public CA trust and, for SyncBridge, its own client identity. Manage these separately from management certificates.
Automatic setup does not renew certificates. Resolve conflicting names, expiry or wrong certificate purposes through Gateway certificate management, save the target/device, rebuild its connection and verify values again.
Optional: manual configuration and other routes
After successful automatic setup and verification, no manual setup below is needed.
Configure SyncBridge manually
For custom endpoints, multiple Hubs or independent plugin maintenance, use SyncBridge in this order:
- Prepare enabled groups at both ends, including the required variables at the site, and add a SyncBridge target at each end.
- Select
HubServerand a listener address at the center; selectEdgePublisherand center endpoints at the site. Give each node a unique Peer ID and use the same nonempty verification token. - For TLS, select a server identity at the center and this site's client identity at the edge. Configure CA trust at both ends. The client identity's DNS name or subject CN must match the site's Peer ID; the TLS target hostname must match the center identity.
- Enable the center first, then the site. Check configuration synchronization and the full snapshot, then perform step 6. Variables removed from scope retain center mirrors marked as missing-source; they are not automatically deleted.
Configure Gateway MQTT manually
The center directly accepts site connections
When the center can open an MQTT listener, automatic GatewayMqtt in step 5 is normally sufficient. To manage listeners, source authentication or client-certificate binding yourself:
- Create a Gateway MQTT Collection Server at the center. Configure its listener, Topic root and independent credentials/ClientIds for each source.
- Add an MQTT Client Producer to the site group and connect to that listener using the matching source identity.
- Apply the fixed Topic and payload settings, inspect the snapshot and apply center variables, then return to step 6.
Both ends connect to a shared Broker
Use this after step 4 in place of Studio automatic setup. Both the center and site are MQTT clients of the same Broker.
- Prepare independent center and site accounts, ClientIds and ACLs at the Broker. Restrict each site to its own Topic namespace.
- Create Gateway MQTT Collection Client in center collection. Enter the Broker endpoint, credentials and Topic root. Register each site's unique
RemoteKey, such asedge-01, under remote sources. - Add MQTT Client Producer (MqttClientProducer) to the site forwarding group, connect to the same Broker with the site identity, and configure Topics and payload as below.
- For TLS, both ends trust the Broker CA and use its matching SSL target hostname. Configure separate client identities only if the Broker requires mutual TLS.
- In center protocol debug, confirm the source is online, request a snapshot, preview variable differences and apply the plan. Return to step 6.
Broker ACLs must allow site variable/response publication and request subscriptions, plus center subscriptions and requests for authorized sources. A connection alone is insufficient for snapshots and synchronization.
Fixed Topics and payload requirements
Gateway MQTT uses a fixed catalog protocol. For Topic root TGateway/Gateway and RemoteKey=edge-01, use TGateway/Gateway/edge-01/Variable, TGateway/Gateway/edge-01/RpcQuest and TGateway/Gateway/edge-01/RpcWrite for variable, snapshot-request and write-request Topics.
Follow Configure MQTT upload on each edge for all fields: enable list upload; disable dictionary upload, retained messages, JSON null filtering and offline-data filtering; leave variable scripts/templates empty; check QoS and chunk size. Use a different RemoteKey at each site.
Receiving a remote catalog does not create queryable local variables until its synchronization plan is previewed and applied. Variable addresses are RemoteKey/RemoteVariableId; use the remote ID, not the ID generated at the center.
Collect third-party MQTT devices
For custom JSON, use ordinary MQTT Collection Client or MQTT Collection Server at the site, with Topic and JSONPath variable addresses.
For example, {"data":{"temperature":31}} published to factory/line1/telemetry can use address factory/line1/telemetry;$.data.temperature. Verify the site reads 31 and follows changes, then add this local variable to the step 4 group for synchronization.
Expansion and maintenance
| Task | Sequence |
|---|---|
| Add a site | Repeat steps 1–6. Keep protocol, port and TLS mode consistent when reusing the center listener. |
| Add points | Verify site collection, then expand scope. SyncBridge follows its configuration policy; MQTT requires a snapshot and applied variable plan, or repeated Studio synchronization setup. |
| Rename a site | Change display names while preserving stable PeerId and RemoteKey identities. |
| Archive a project | Download direct site edits before exporting the Studio project; also download Watchdog backups. |
| Update Gateway | Back up projects, host settings and certificates; deploy with the correct runtime and Update RUNTIME; repeat step 6. |
| Restore a project | Check the target and backup, restore in Watchdog, then verify process, collection and center values. Host certificates and CA signing capability require separate recovery. |
| Replace certificates or shared ports | Identify affected sites, prepare certificates/endpoints, switch during a maintenance window and verify each site. |
Record site names, management endpoints, project versions, runtime identifiers, synchronization protocol/port, certificate expiry and backup locations. Keep credentials, PFX files and private keys in controlled storage.
Troubleshoot the failed step
| Symptom | First checks |
|---|---|
| Step 1: Watchdog works but Gateway does not | Active project, complete GatewayApp, API port and startup logs. |
| Step 2: Studio test returns 401 / 403 | Site Watchdog credentials and management/deployment permissions. |
| Step 2: enrollment fails | Code expiry/use, reachable Studio URL and HTTPS trust. |
| Step 2: tunnel connected but not bound | Center mapping port conflicts, access key, source address and binding logs. |
| Step 3: site variable unhealthy | Device address, channel, station, data type and collection logs. Fix local collection before center synchronization. |
| Step 5: connecting both ends fails | Both URLs must be Gateway management endpoints; check Gateway credentials and permissions. |
| Step 5: no forwarding group listed | Save and enable the site group, then reconnect both ends. |
| Step 5: partial failure or synchronization pending | Inspect the failed stage. If management works but data does not, check site reachability of the data listener, protocol and TLS. Fix and retry with the same parameters. |
| TLS handshake fails | Mode, CA, identity purpose/private key, validity, clock and hostname. For manual SyncBridge, also check Peer identity and revocation policy. |
| Step 6: MQTT source online but no center variables | Site scope, fixed Topics, list payload, snapshot and applied variable plan. |
| Step 6: center value does not update | Check site value, forwarding scope/trigger, connection/cache, revision or snapshot, then center variables, in that order. |
Daily operations: Studio manual, Watchdog manual and Gateway manual.