On this page
Collection Configuration
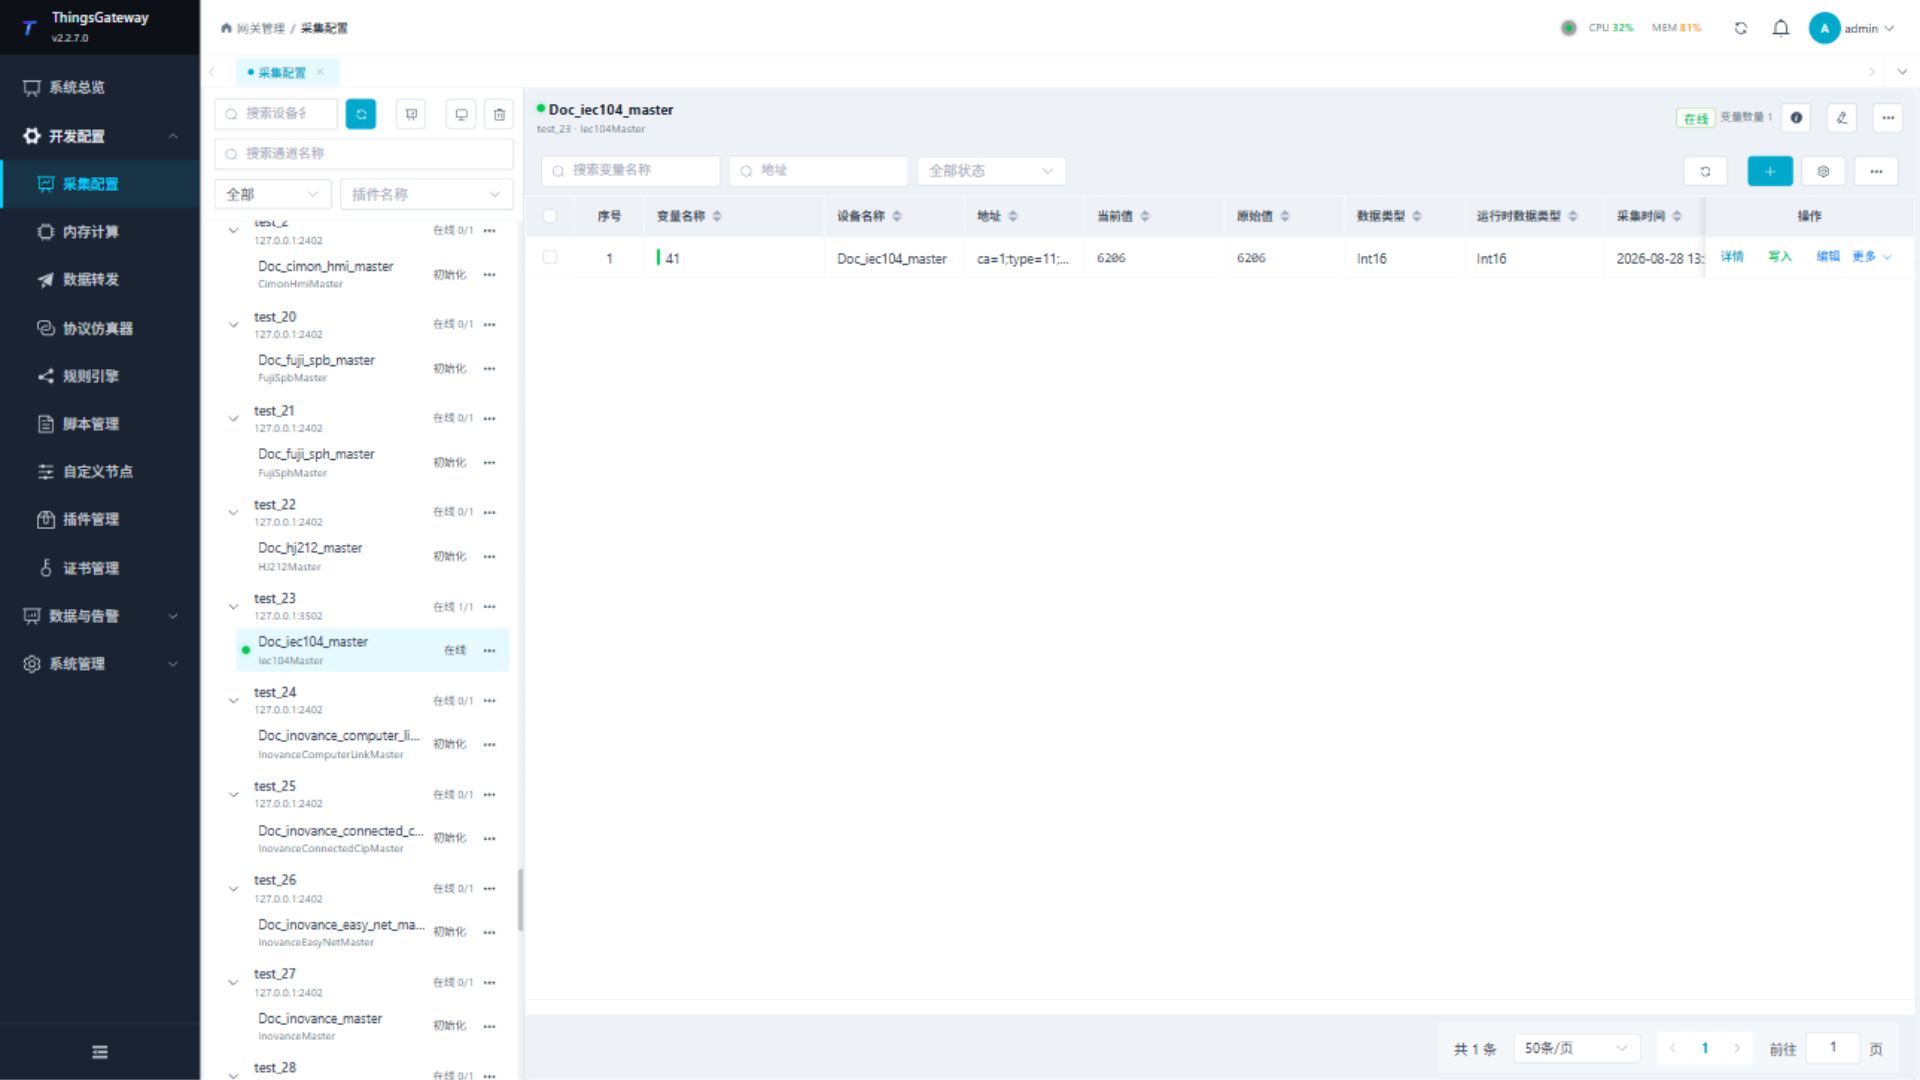
Open Development Configuration → Collection Configuration. A channel defines the connection, a device selects the protocol, and a variable defines the point to read. Without physical equipment, begin with Collect Your First Point.
For byte order, string length, BCD format, and encoding, go directly to Common Variable Register Options.
Add your first point
Prepare the device address or serial settings, protocol, station ID, one known point address, and its data type. Verify a small sample before importing the full point list.
1. Create a channel
Click Add Channel at the top of the resource panel and enter a name. Select TcpClient for a device providing a TCP endpoint, and enter its actual IP:port, such as 192.168.1.10:502. For serial devices, match the port, baud rate, data bits, parity, and stop bits. Keep the channel enabled and save.
Use a separate channel for each ordinary collection device. Share one only where the plugin manual explicitly supports it. Plugins supporting only Other do not require an ordinary channel.
2. Create the device
Click Add Device, enter a name, select its collection plugin, and associate the new channel. Open the plugin-properties tab and fill in the protocol parameters: for example, Modbus requires its mode and station ID, while Siemens S7 requires PLC and connection settings. Start with an execution interval of 1000 milliseconds, keep the device enabled, and save.
3. Create a variable
Select the device and click Add in the variable list. Enter the variable name, confirm its device, and use the known point address and matching data type. The variable address is not the device IP. For monitoring, use read-only access and leave RPC writes disabled. Save with the remaining defaults.
4. Verify the result
Wait for the device to become online. Confirm that the current value agrees with the source and the sample time advances. Enable automatic refresh or refresh manually if the value is not displayed. Open Protocol Debug for a representative address read when needed.
After the first point is correct, add a few representative points, verify units, ranges, and alarms, then import the complete list. Inspect every import result and export the completed configuration for delivery. Share a channel only where the plugin manual explicitly supports it; DTU Service and Gateway MQTT have documented shared-connection modes.
Terms and the field-configuration checklist
| Term | Meaning |
|---|---|
| Channel | A communication link such as a TCP connection, UDP session, or serial port. |
| Device | A PLC, instrument, module, or logical object managed by a collection plugin. |
| Variable | A point with an address, type, permissions, expressions, filtering, and optional alarms. |
Other | A plugin that manages its own connection or does not require an ordinary channel. |
| Cron expression | A schedule expression. Routine fixed periods can use milliseconds; 1000 means one second. |
| RPC writes | External or page-initiated point writes. Enable only for points that need control. |
| StreamAsync | The serial-port asynchronous I/O mode. Keep the default while communication is stable. |
| DtuId | The identifier used to distinguish a DTU or transparent terminal. |
| Topic | The messaging path agreed with a system such as MQTT or Kafka. |
| Confirm before configuring | Required information |
|---|---|
| Communication method | TCP client/server, UDP, serial, OPC UA/DA, MQTT, or plugin-managed connection. |
| Connection | IP, port, serial settings, credentials, certificates, and firewall policy. |
| Device identity | Model, station ID, rack/slot, DTU identifier, OPC namespace, or MQTT topic. |
| Point table | Names, addresses, types, units, ranges, permissions, and alarm thresholds. |
| Verification | PLC software, instrument display, receiving system, or calibrated reference value. |
| Write permissions | Which points may be controlled and the field conditions required before writing. |
Maintain the collection configuration
Page Structure
| Area | Description |
|---|---|
| Left Resource Panel | Display devices grouped by channel; channel titles display the number of online devices and channel summaries; Other type devices not bound to the regular channel are displayed in tiled groups. The panel supports filtering by device name, channel name, device status, and plugin name. |
| Device Workbench | Switch between Real-time Variables, Details, Protocol Debug, Channel Logs, and Device Logs. The right side shows the selected object’s status and edit action. |
| Real-time Variables | Displays current values, quality, sample times, and errors for the selected resource. |
| Protocol Debug | Provides the address-reading, message-monitoring, and diagnostic pages available for the selected plugin. |
| Page Operations | The resource panel provides refresh and channel/device management. The variable toolbar Show More menu contains import, export, and test-data commands. |
After selecting a channel or device on the left, the variable list on the right is filtered to that scope. Device rows show online status, redundancy role, and collection plugin so you can quickly confirm that each device uses the intended channel and plugin.
Resource Panel Operations
| Operation | Instructions |
|---|---|
| Search by device name | Filter resource panel by device name. |
| Search channel names | Filter by device channel name. |
| Device Status Filtering | Only displays online or offline devices. |
| Plugin Name Filter | Only displays devices under the specified collection plugin. |
| Select channel groups | View devices and variables under that channel. |
| Select Ungrouped Devices | View Other types of devices and variables that do not require a standard communication channel. |
| Select the device | View its variables and use the device context bar to open details, editing, or the operations workspace. |
Parameter reference: channels, devices, variable list, and variable configuration. See channel transport for connection and timeout decisions, and collection strategy for intervals, packing and concurrency.
Channel Management
Click “Channel Management” to open the Channel Management drawer.
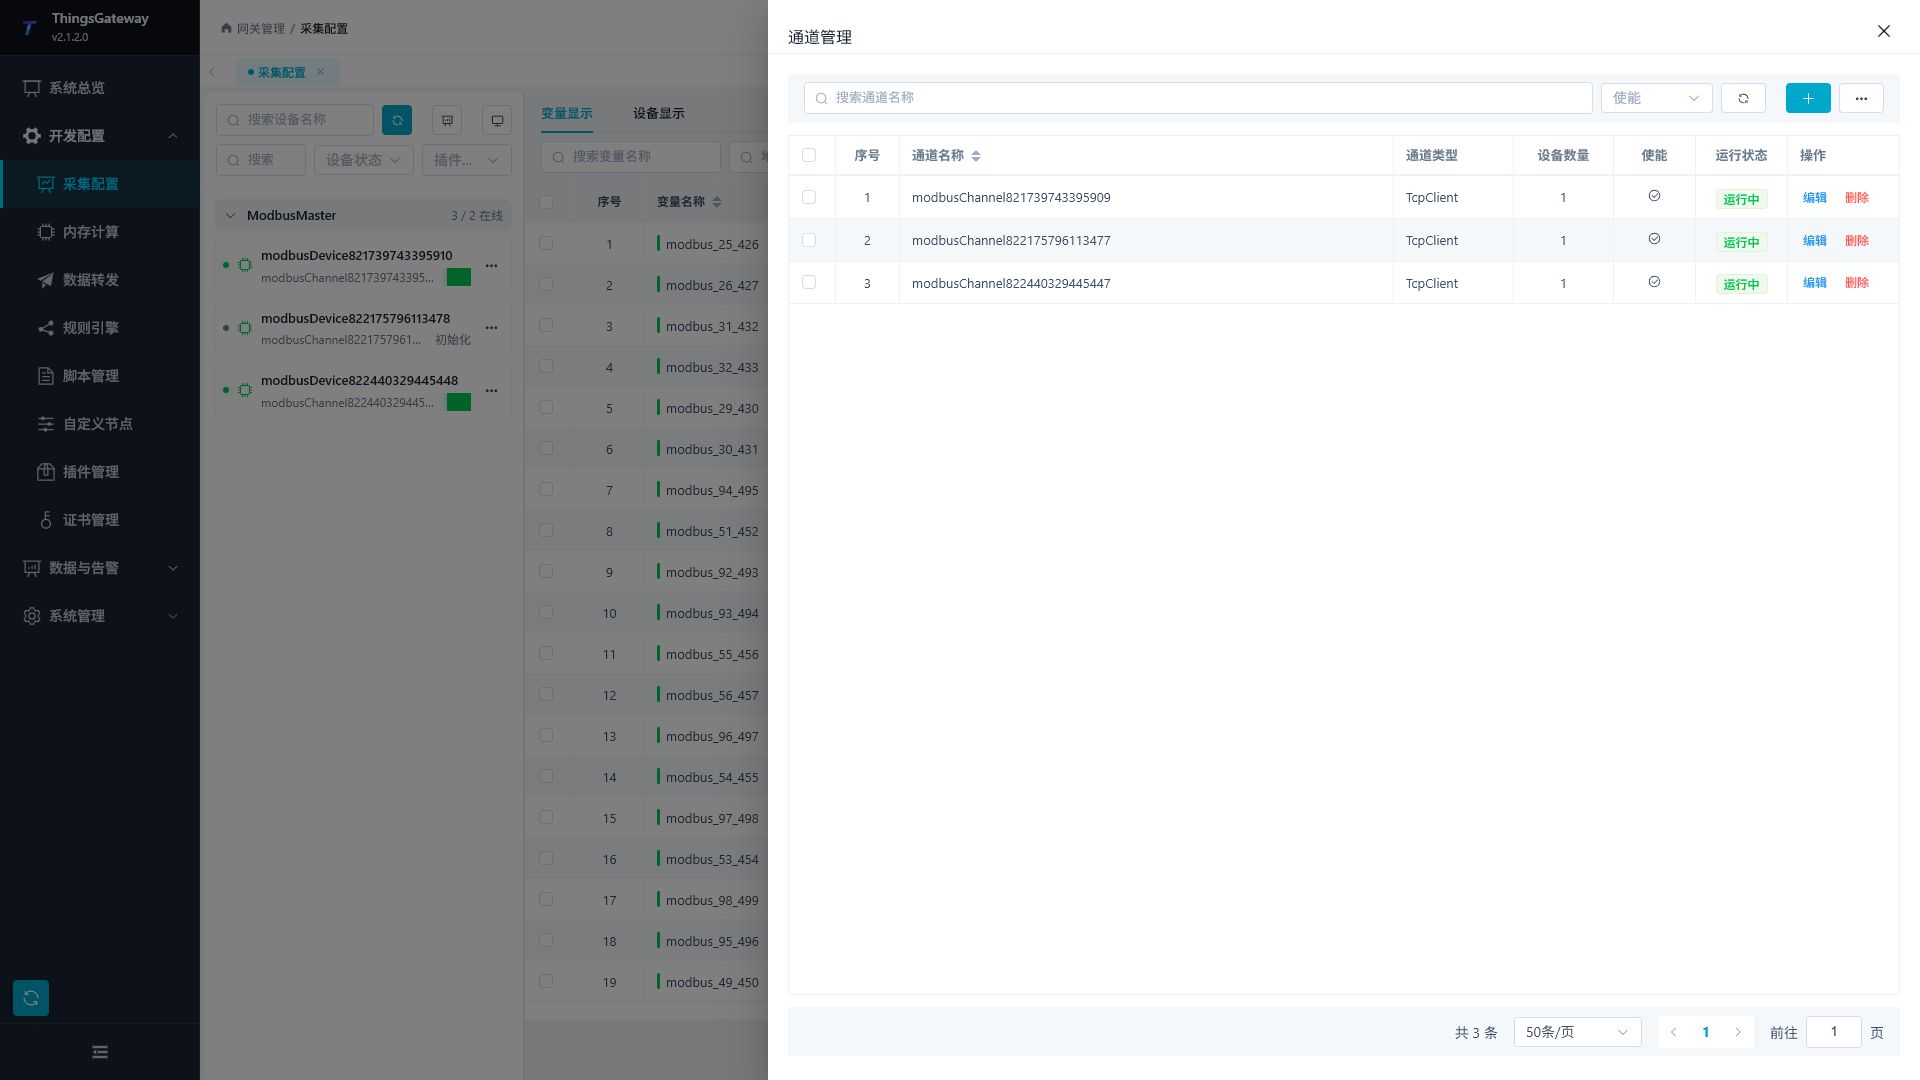
| Operations | Description |
|---|---|
| Search | Filter channels by channel name or enabled status. |
| Added | to open the channel configuration popup and create a channel. |
| Edit | Modify the basic channel information and communication parameters. |
| Delete | Delete individual channels. Before deletion, confirm that devices under the channel are no longer in use. |
| Batch Edit | Batch adjust some configurations of selected channels. |
| Batch Delete | Delete multiple selected channels. |
| Refresh | Reread the channel list. |
Channel Configuration
Click “New” or “Edit” to open the Channel Configuration popup.
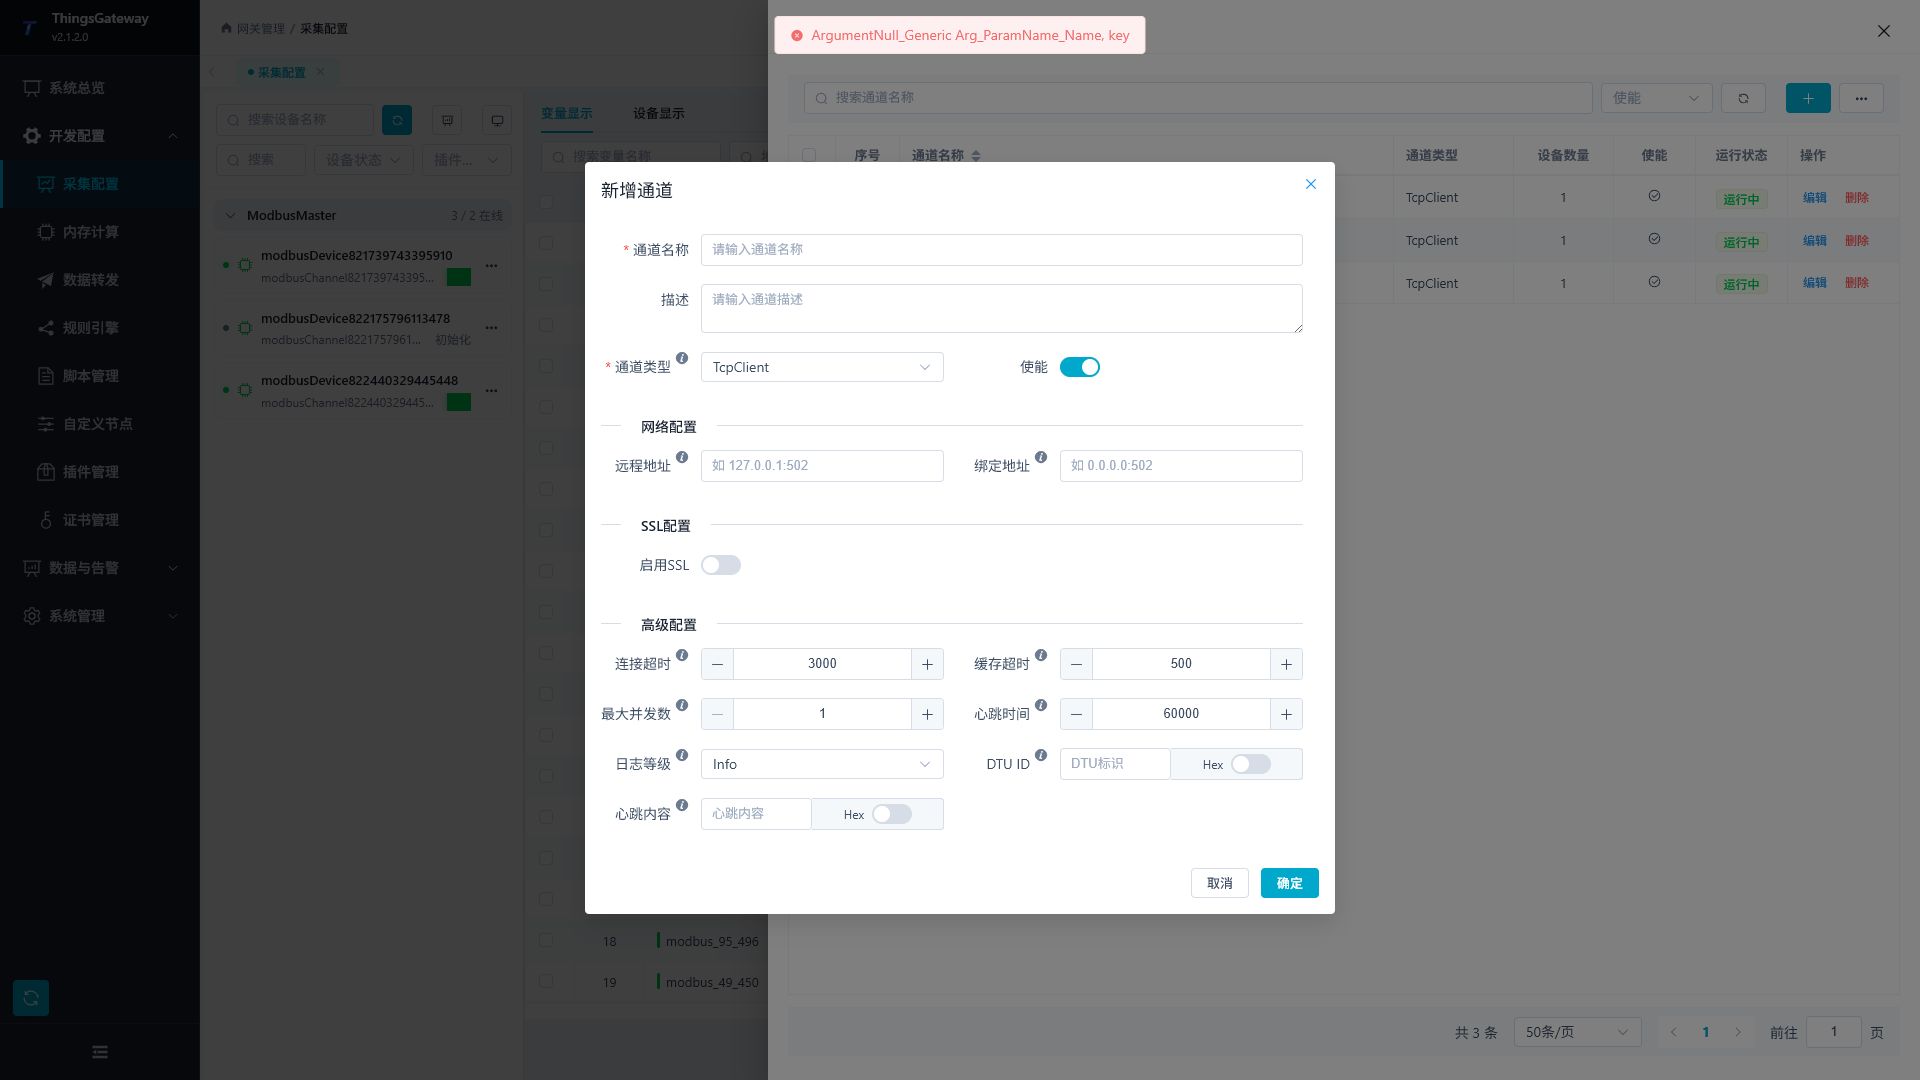
| Configuration Items | Description |
|---|---|
| Channel Name | Channel display name; it is recommended to name according to protocol, field link, or device group. Do not use Memory for names; this name is reserved for memory variables. |
| Description | Purpose of the channel, connection object, or site location description. |
| Channel Type | Select the communication method. Network channels display applicable remote and binding addresses; TCP channels also provide TLS settings. Serial channels display serial-port parameters. |
| Enable | to control whether the channel is running. Once closed, devices under this channel cannot collect data through this channel. |
| Remote Address | The counter address for client-mode connection, commonly in formats such as IP: port or domain name: port, for example, 192.168.1.10:502. TCP clients must provide a remote address; UDP sessions must fill in at least one of the remote address or the bound address. When providing an address with the agreement on-site, you may fill in the prefix tcp://, ssl://, or http(s):// as required by the other party. |
| Backup Remote Address | Backup peer address for TCP client channels. If the primary remote address fails to connect, the connection is disconnected, or communication times out, the channel will attempt to switch to that address within the same device and channel. As long as either primary or backup links are available, the device will not immediately switch between primary and backup devices due to a single TCP link failure. Leaving a blank means TCP client network redundancy is not enabled; The backup address should not be the same as the remote address. |
| Binding address | The address where the server mode listens locally on the gateway is commonly used. 0.0.0.0: port means other hosts are allowed to connect,127.0.0.1: port only allows local connections to be allowed. The TCP server must fill in the binding address; UDP sessions must fill in at least one of the remote address or the bound address. If protocol monitoring is required, you can fill in the tcp://0.0.0.0: Port or ssl://0.0.0.0: Port as agreed on site. |
| Enable SSL | TLS for TCP client and TCP service channels; UDP and serial channels do not use it. Enable when the peer requires encrypted communication, bidirectional certificates, or certificate verification; The plaintext protocol on the regular intranet remains closed. When enabling SSL on the TCP server, you must select the server certificate; otherwise, the client cannot complete the TLS handshake. |
| SSL target host | used by TCP clients to enable SSL for validation certificate hostnames. When connecting via IP but the certificate is issued to a domain name, fill in the domain name in the certificate. |
| SSL client certificate / server certificate / CA certificate | client certificate used by the gateway to prove identity to the peer; Server certificates are provided to clients when the gateway acts as a server listener; CA certificates are used to verify peer certificates. Certificates must first be maintained in the “Certificate Management” section. |
| Allow untrusted certificates | Enabling relaxes peer identity validation. Disabling uses strict validation with the correct CA and also makes a TCP service require a valid client certificate. Prepare terminal identities and follow the direction-specific TLS setup. |
| SSL protocol / check certificate revocation | specify TLS version and enable revocation check when handshake failure or on-site security policy requirements; Default is maintained without explicit requirements. |
| Port Name | The serial port name used by the serial port channel, such as COM1 or /dev/ttyS0. The serial port channel must be filled with the port name, and the host must recognize the serial port. |
| Baud rate, data bits, check bits, stop bits, | serial communication parameters must be consistent with the field equipment. |
| DTR / RTS / handshake mode | serial hardware flow control parameters. Adjust when the on-site serial server, RS485 converter, or instrument manual require activation. |
| StreamAsync | Serial port asynchronous read/write method. On-site can be understood as a serial port-driven read/write mode; When serial communication is stable, it remains at default; when issues such as blockage or untimely reads occur, adjustments can be made according to the requirements of the field driver. |
| Serial port read/write buffer | The size of the read and write buffers used for serial communication. Scenarios for large numbers of continuous or long messages can be appropriately increased. |
| Connection timeout | Budget in milliseconds for connection establishment, including relevant TLS work. Increase it only to cover observed connection latency; protocol response timeout is configured separately in the device plugin. |
| Cache timeout | Receive-frame assembly timeout in milliseconds; default 500, minimum 100. Keep the default for the first connection and do not enter 0. This is separate from the variable refresh period. |
| Maximum concurrency | The number of requests allowed to be processed simultaneously on the same channel. When the on-site device request order is strict, keep 1; increase after confirming that the peer supports concurrency. |
| Heartbeat Content / Heartbeat Time | Shared channel fields whose actual sending or response depends on the plugin and direction. Filling them in does not establish that an ordinary collection connection sends heartbeats. Hex parses configured content as bytes; see Channel Transport. |
| Maximum Number of Connections / Client Cleanup Time | TCP server channel is used to limit the number of clients and clear idle connections. If there are many upper-level computers or DTU, confirm that the maximum number of connections is sufficient. |
| DTU ID / DTU ID Hex / DTU service type | Used by supported registration paths. A TCP server registers the terminal ID as text or Hex; the device plugin’s DTU ID must use the same representation. Hex does not change registration bytes on the wire. See DTU Service for Default and DDP registration. |
After configuring a backup remote address on the TCP client, the gateway will still prioritize connecting to the “remote address” when the gateway starts or the channel restarts. After switching to an alternate address during operation, it will retain the currently available link; Only try another link if the current link fails again. This configuration only applies to the TCP client channel on the acquisition side and does not affect the TCP server, UDP, serial port, or device primary and backup redundant configuration.
When batch editing channels, only the fields that have actually been adjusted in the batch popup will be modified. Used for unified start-stop, log levels, timeout, heartbeat, SSL, and other public configurations; The addresses, serial port names, and certificates of different types of channels should still be checked individually.
Device Management
Click “Device Management” to open the Device Management drawer.
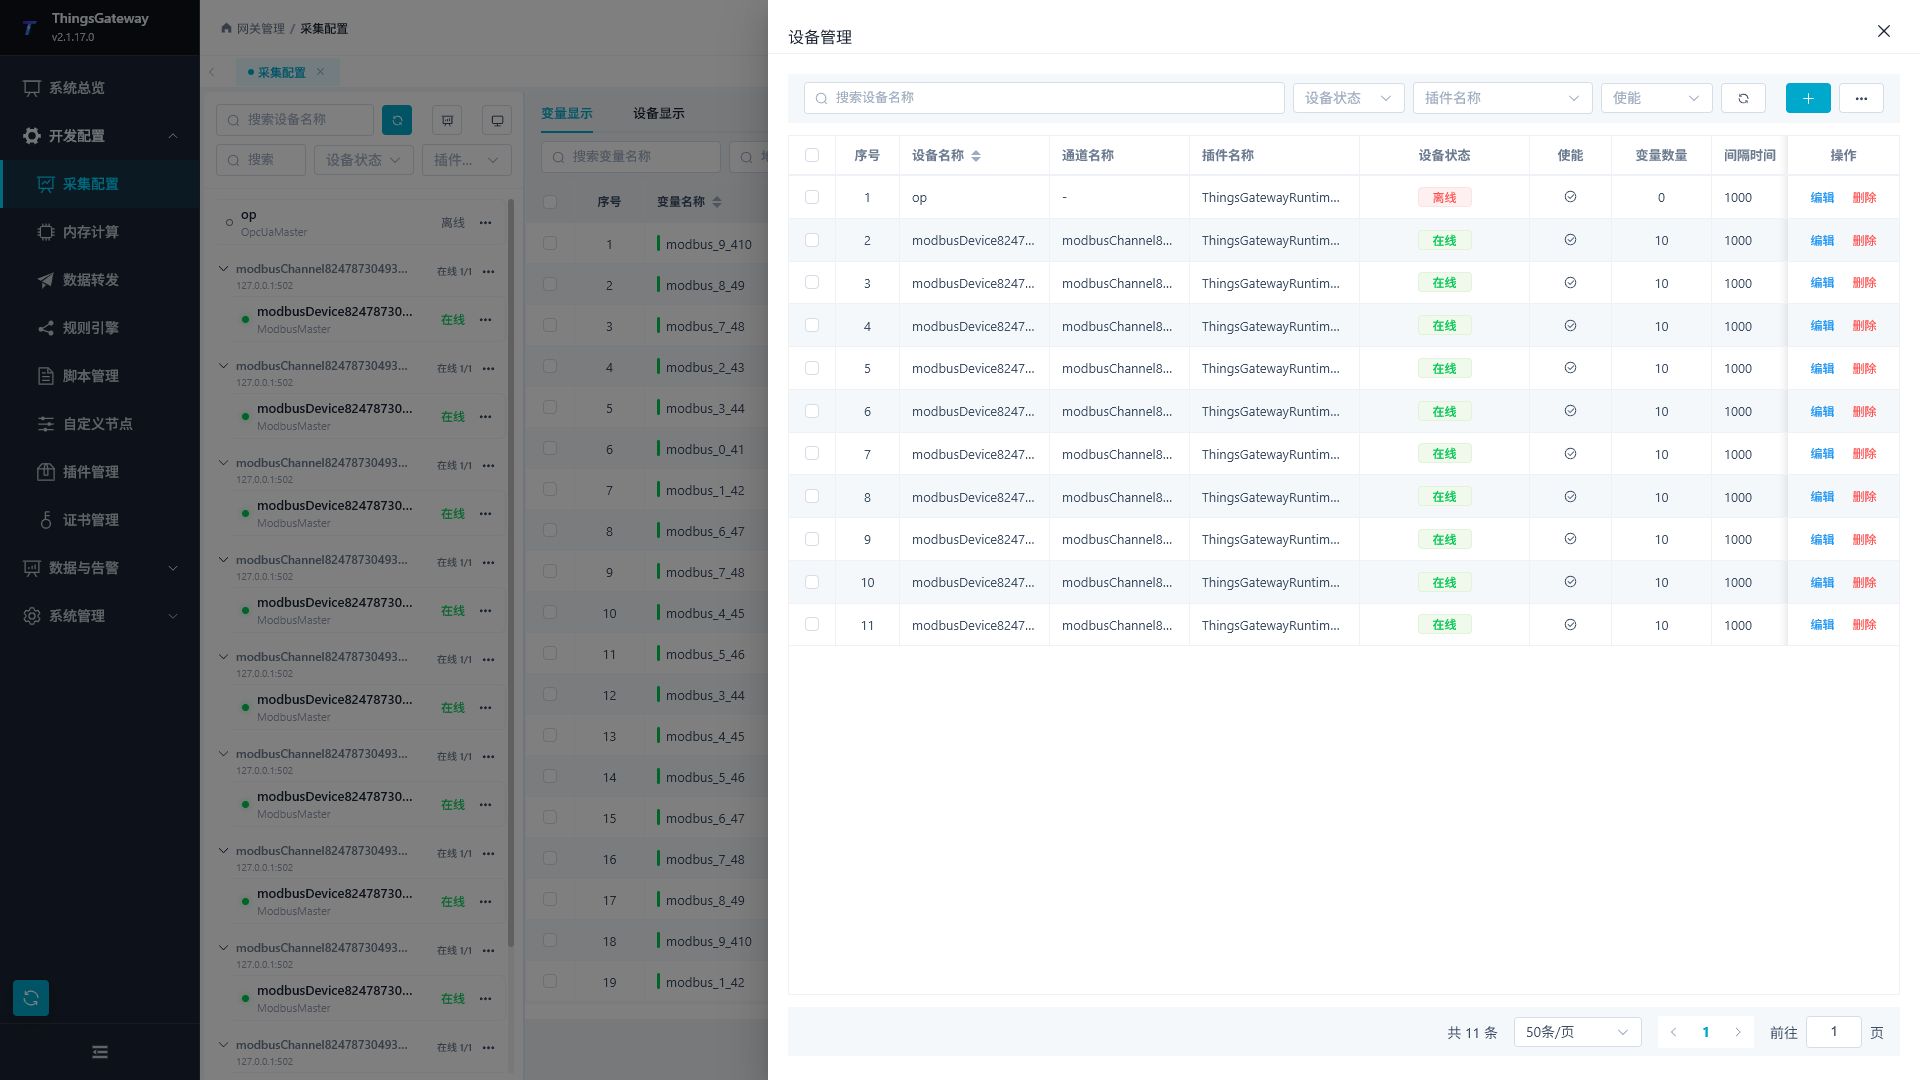
| Operation | Instructions |
|---|---|
| Search | Search by device name. |
| Status Filtering | Filter by online or offline status. |
| Plugin Filtering | Filter by Collection Plugin. |
| Enable Status Filtering | Enable or Disable Filtering. |
| Added | to open the device configuration popup and create a device. |
| Edit | Modify device base information, plugin properties, and redundancy configuration. |
| Delete | Delete the device. Before deletion, confirm that variables under the device are no longer needed. |
| Batch Edit | Batch adjust some configurations of selected devices. |
| Batch Delete | Delete multiple selected devices. |
| Refresh | Reload the device list. |
Device Configuration
Click “New” or “Edit” to open the device configuration popup.
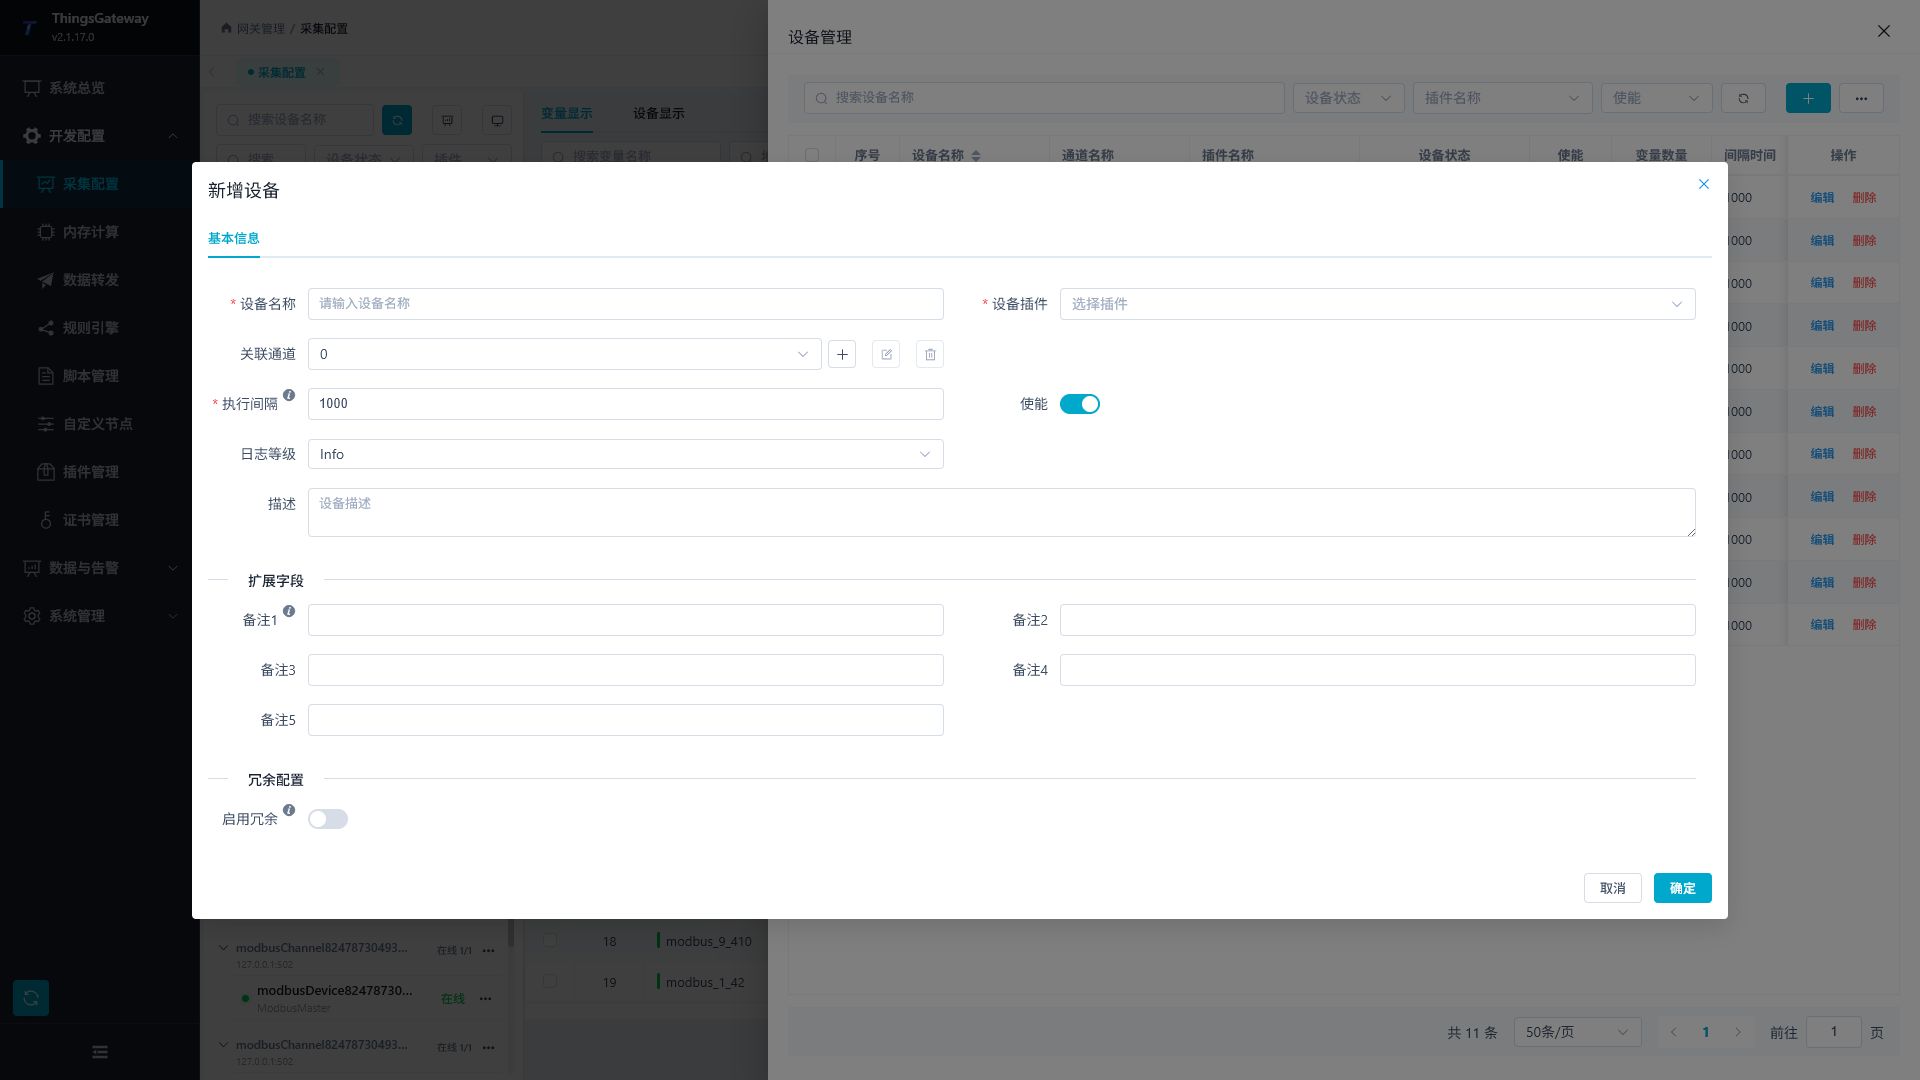
| Configuration Items | Description |
|---|---|
| Equipment Name | The device display name should match the on-site equipment number. Names should not include English periods ., do not use Memory. Memory is the device name used by the system memory variable. |
| Device Plugin | Select the Collection Plugin. After selection, the device attributes of the plugin will be displayed. |
| Channel | Select the channel used by the device. TCP, UDP, and serial plugins normally require a channel; use one channel per device unless the plugin manual explicitly documents channel sharing. Plugins that only support Other (without a standard communication channel) can be left blank. You can add, edit, or delete channels next to this field. |
| Execution interval | The device collects execution intervals, which can be filled in milliseconds or Cron timer expressions, for example, 1000 means 1 second, */5 * * * * * means every 5 seconds. Priority is given to filling in milliseconds during routine on-site cycles; The smaller the spacing, the higher the real-time performance, but it increases the load on devices and gateways. |
| Enable | to control whether the device participates in collection. |
| Allow method calls | Off by default. Allows all exposed direct methods without variable binding; variable RPC retains its own permissions. See Plugin Method Calls. |
| Log Level | Control the detail of equipment operation logs. When troubleshooting, you can temporarily upgrade the log level. |
| Description | Equipment usage, site number, or installation location. |
| Notes 1 to 5 | Custom extension fields for the project. |
| Enable redundancy | Configure backup devices for critical equipment. |
| Redundant devices | After redundancy is enabled, select backup devices. Backup devices should use the same collection plugin and have configured channels, plugin properties, and variables; Equipment that has already been used as a backup for other devices cannot be reselected. |
| Redundancy Mode | can switch offline, or switch via scripts. Offline switching is suitable for automatic switching when the main device is inaccessible; Script switching is suitable for judgment based on quality, business status, or external conditions. |
| Scan interval | Redundancy state check interval, unit milliseconds, minimum 10,000. The shorter the interval, the faster the switching, but this increases the frequency of inspections. |
| Switching Scripts | Redundancy mode is selected when switching scripts. The script should return the decision on whether to switch, making it suitable to decide between principal and standby based on business conditions. When switching scripts, you must select the script. |
| Plugin Properties | Provided by the selected collection plugin, such as station ID, timeout, byte order, authentication, and subscription parameters. Use the matching topic in the Plugin Manual Index for dynamic properties, address formats, special methods, and verification; configure common variable fields on this page. |
Device plugins provide available channel types. When adding or editing a device, select the plugin first and then choose a matching channel. Do not reuse another device’s channel unless the plugin manual explicitly says that sharing is supported. If the plugin only supports Other (no standard communication channel), the device can be saved without a channel and appears in the ungrouped area.
Redundant devices should not duplicate overlapping configurations: Do not enable redundancy for backup devices. Before going live, you can disable the main device or disconnect the main link and observe whether it switches to the backup device as expected.
Variable List
The variable list remains visible in the main Collection Configuration workspace and shows the current resource scope.
| Tools | Description |
|---|---|
| Search by variable name | Search by variable name. |
| Search address | Search by register address or protocol address. |
| Resource Range Filtering | Select variable ranges through left-side channels or devices. |
| Status Screening | Filtering by normal or abnormal status. |
| Refresh | Manually refresh the variable list. |
| Auto-Refresh | After activating, set the variable values automatically according to the page settings. |
| Add a variable | Open the variable configuration popup. |
| Batch Edit | Batch modify selected variables. |
| Batch Delete | Delete selected variables. |
| Column Settings | Customize Variable Table Display Columns. |
Common columns include device name, variable name, description, register address, current value, original value, last set value, data type, unit, collection group, business group, online status, enabled status, acquisition time, change time, and error information.
Raw value preserves the collection input; current value is used by business calculations and downstream processing. Last set value records the value before a runtime update and can also change during ordinary collection. It is not an audit record of the most recent manual or RPC command. Verify writes using per-point results and source readback.
Memory variables are maintained on the “Memory Calculation” page. This page only displays variables under the Memory device, suitable for saving scripts, rules, or internal calculation results; The collection configuration page mainly maintains the channels, devices, and variables connected to field equipment.
Variable Configuration
Click “New” or “Edit” in the variable list to open the variable configuration popup.
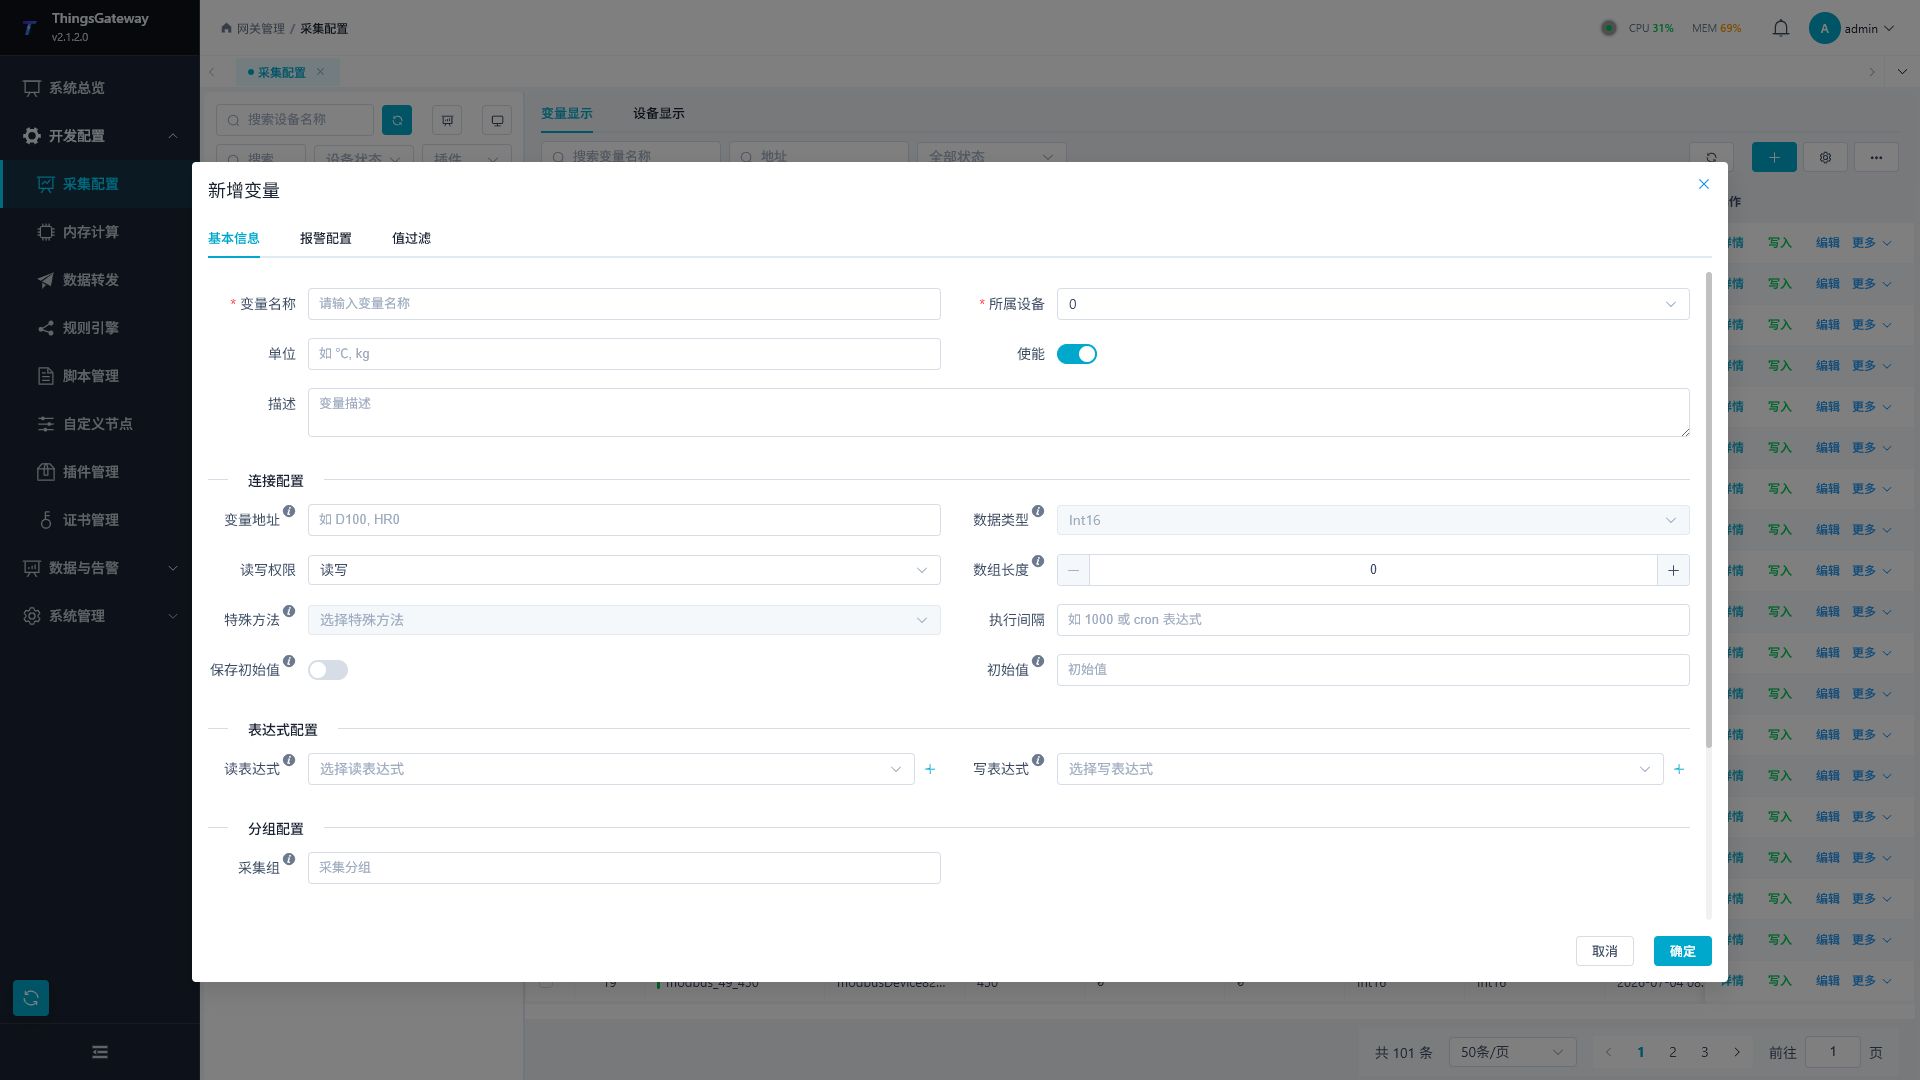
| Configuration Items | Description |
|---|---|
| Variable Name | Point Name, It is recommended to keep consistent with the device point list. |
| Belonging Equipment | Variable belonging device. After selecting a device, the address prompt and optional data types will be refreshed by the plugin. |
| Units | Variable displays units. |
| Enable | to control whether variables participate in collection. |
| Description | Description of the purpose of the location. |
| Variable address | Internal device register, node, Topic field, or protocol address. The address format is determined by plugins; for example, Modbus uses register addresses, OPC UA uses node identifiers, and MQTT uses Topic and Payload fields. Plugins supporting common conversion options can append data, len, bcd, and encoding; see Common variable register options. |
| Data Type | Data Type of the Collected Value. It must be consistent with the actual data of the equipment; If the value display is inverted, accuracy is abnormal, or the boolean state is incorrect, the data type, variable address, array length, and plugin byte order should be checked simultaneously. Memory variables are saved by object value, without filling in the field equipment address. |
| Read and write permissions | Choose read-only, read-write, or write-only. Before writing, confirm that on-site equipment is authorized to distribute the data. |
| Decimal places | Empty leaves precision unchanged; 0 rounds to an integer. The accepted range is 0–28, with Float capped at 6 and Double at 15. Rounding affects the final floating-point or Decimal scalar runtime value, while the raw value remains intact. |
| Array length | Number of elements, not bytes. Register parsing in plugins such as Modbus Master returns a scalar for both 0 and 1, and an array above 1. String byte length uses address option len. Check other plugins separately; memory variables do not use this field. |
| Special Methods | Special read/write methods provided by plugins. After selection, variable addresses are usually used as parameters for this method, and are no longer packaged as regular register addresses; Only select when field protocols, plugin instructions, or debugging requirements are clearly needed. |
| Execution interval | Leave blank to inherit the device interval; do not substitute 0 for an empty field. For independent scheduling, enter milliseconds or a Cron expression such as 500 or */10 * * * * *. |
| Initial value | Starting point when the variable is loaded, independent of saving the latest snapshot. It does not write a physical device and can be replaced by new collection. |
| Save Initial Value | Persists the latest snapshot for future loading. Collection variables save the raw value. Turning it off stops new samples from updating the starting value. |
| Force Save Value | Requires Save Initial Value. Updates enter a background queue merged per variable; otherwise ordinary periodic saving applies. See Memory Snapshots. Neither mode records every historical change. |
| Trigger Mode | Memory variables can be configured to trigger by variation, interval, or interval/change. Calculate the linkage according to the appropriate variation; Calculated by interval suitable cycle; The intervals/variations suit scenarios where both are needed. Ordinary collection variables perform periodic collection by device or variable, and do not require maintenance. |
| Read expressions / Write expressions | Read expressions to convert the collected raw values into business values; Write expressions are used to convert the value written to a page or external into the value required by the device. Ordinary collection variables select data conversion scripts; Read expressions for memory variables are used to calculate memory values. After selecting an expression with parameters, you need to fill in the expression parameters. |
| Read expression parameters / Write expression parameters | Input parameters required by the expression. The page displays parameter names and data types; Variables cannot be saved when required parameters are missing. |
| Before-read expression chain | Runs before active collection. A rejected condition skips that variable while other variables continue. |
| After-write expression chain | Runs in order after a successful write. The request waits for every step to finish, including delays and writebacks. |
| Control interlock | Associates a command with a separate guard variable. Each command actively reads the guard’s collection source before checking authorization. |
| Collection Group | Set business group names for variables. Plugins that support packaged collection try to merge and read variables within the same group as much as possible; Data forwarding can also be filtered by collection group or in batches. |
| RPC writes | to control whether this variable allows external systems to write points backward via RPC, MQTT, OPC UA, Modbus slave stations, etc. Variables involving device control should be turned on cautiously. |
| Write Check | After a successful write, read the same variable again and compare the readback value with the write value. Suitable for points where confirmation of write is indeed effective; Devices that only write variables, have delayed effects after writing, or have proportional conversion or writeback rounding points should not be enabled arbitrarily. |
| Notes 1 to 5 | Custom extension fields for the project. |
When batch editing variables, only the fields that have been modified in the batch popup are saved. Before batch modifying data types, addresses, read/write permissions, expressions, or alarms, you should first filter variables of the same device, protocol, or data type to avoid applying incompatible configurations to other locations.
Before-read and after-write expressions
The existing read and write transformation chains retain their execution positions. Steps run in order with independent parameters.
| Built-in script | Use |
|---|---|
| Reject when a variable condition fails | Enter the device, variable, expected value, and operator. Checks the related variable’s current value; requires online quality by default. |
| Reject values outside a range | Set inclusive minimum and maximum values. Invalid numeric input or an out-of-range value rejects the operation. |
| Write a variable after a delay | Use in the after-write chain. Set the delay and JSON write value. Blank target fields select the current variable. By default, writing 1 triggers a delayed write of 0. |
For an independent expression-based interlock, add the delay script to a memory guard’s after-write chain with a three-second delay and write value 0. Add the variable-condition script to the command’s write chain, referencing the guard and expected value 1. The guard write request waits until the delayed reset completes. Issue the command from another request during this window. After the guard resets, the next command must be rejected. A condition in a point’s before-read chain can independently block collection for that point.
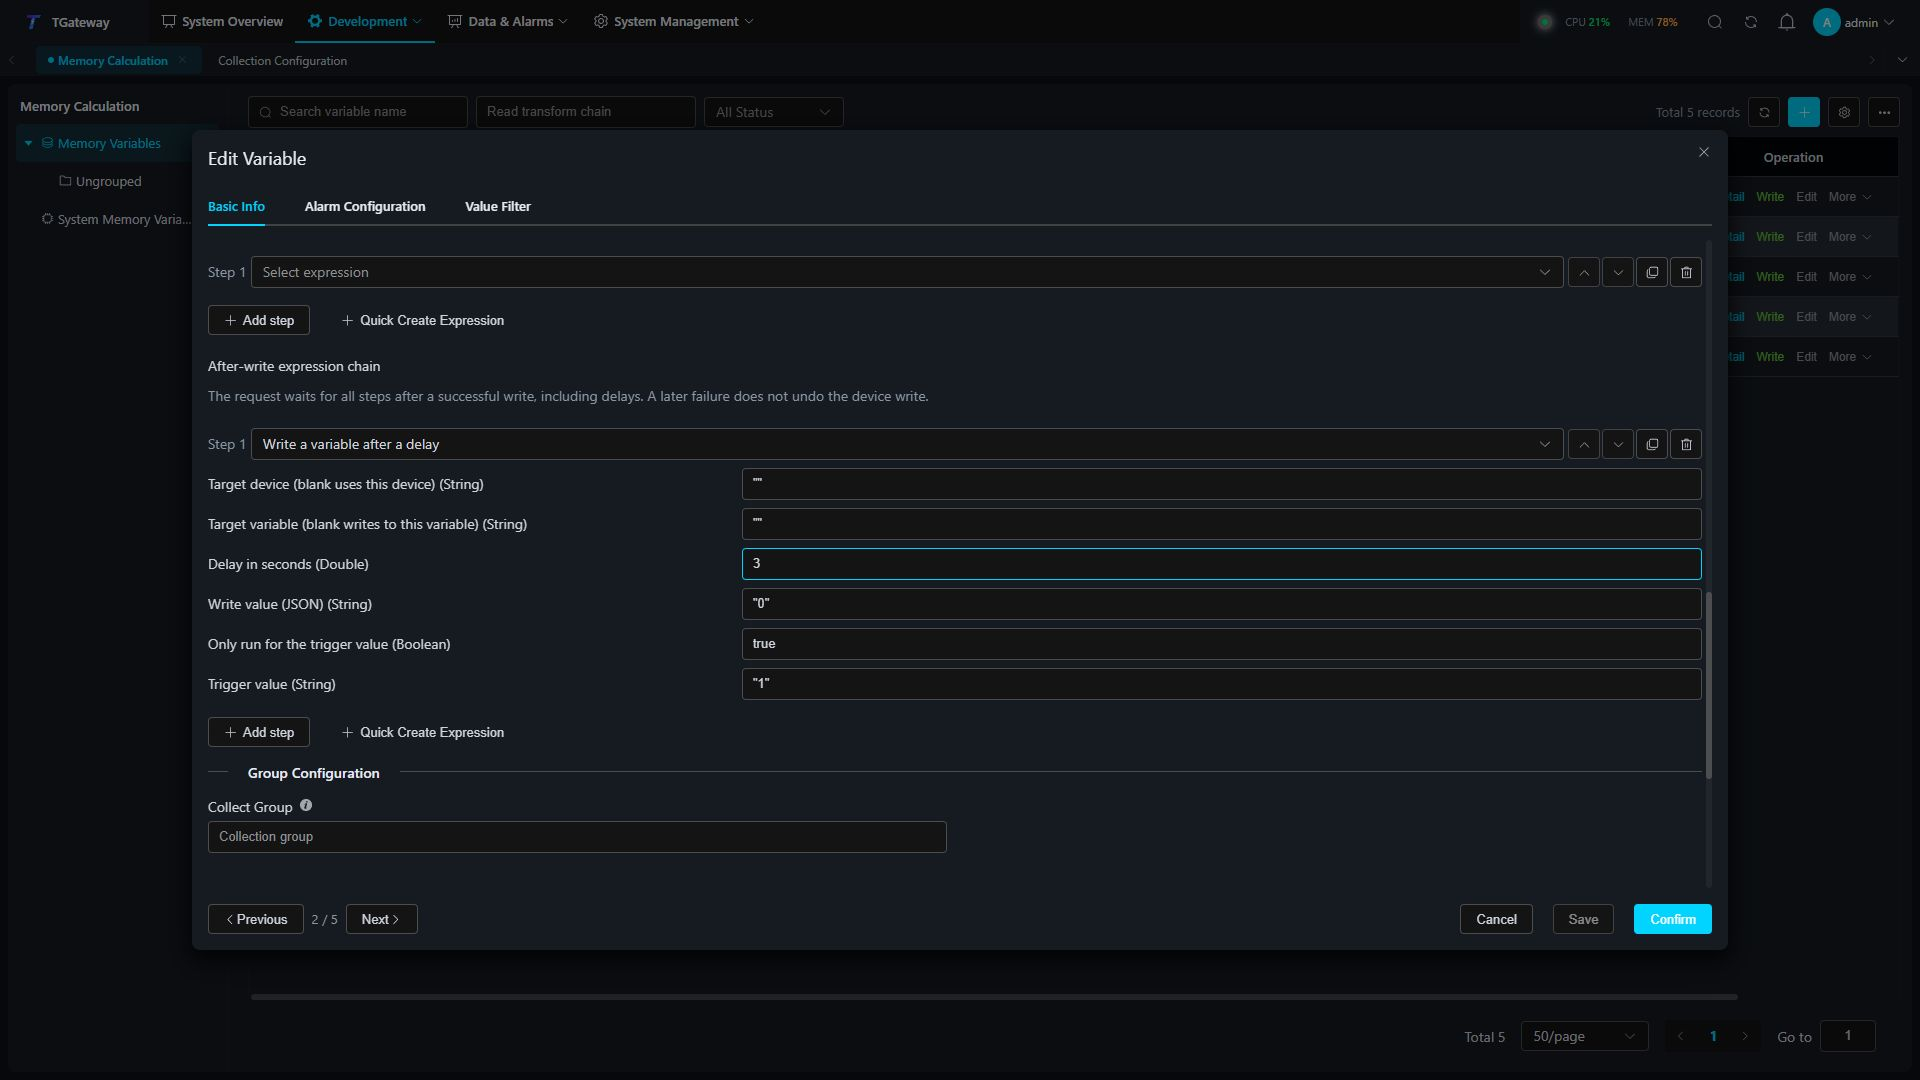
The original request returns after all after-write steps finish. Waiting releases communication locks. If a step fails or is canceled, the result explicitly reports that the device write succeeded but post-write processing failed; the applied value is not rolled back. Do not blindly retry the original command. Concurrent writes do not cancel each other’s steps. Request cancellation, device stop, and configuration reload cancel waiting steps. See Asynchronous scripts.
Variable control interlock
The variable interlock and expression chains work independently. Use the variable interlock when each command must verify a physical source through active communication. The condition script checks the related variable’s current runtime value.
- Edit the command variable, enable Control interlock, and select a different Guard variable.
- Set Allowed state, for example
5. Numbers, booleans, and text are supported; enter""for empty text. - To reset the guard through TG, enable Reset on expiry, set Closed state to
2, and Window (s) to4. The guard must be writable. Write5to the guard through TG, then issue the command in a separate request. After four seconds the guard should become2, and the next command must be rejected. A value of5sampled from the device does not arm the TG timer. - To follow external state only, disable Reset on expiry. Each command actively reads the guard source. Only the allowed value authorizes the command; TG starts no timer and writes no guard value.
- Verify that rejected commands do not change the device command value. Communication failures, offline quality, and rejected samples must also reject commands.
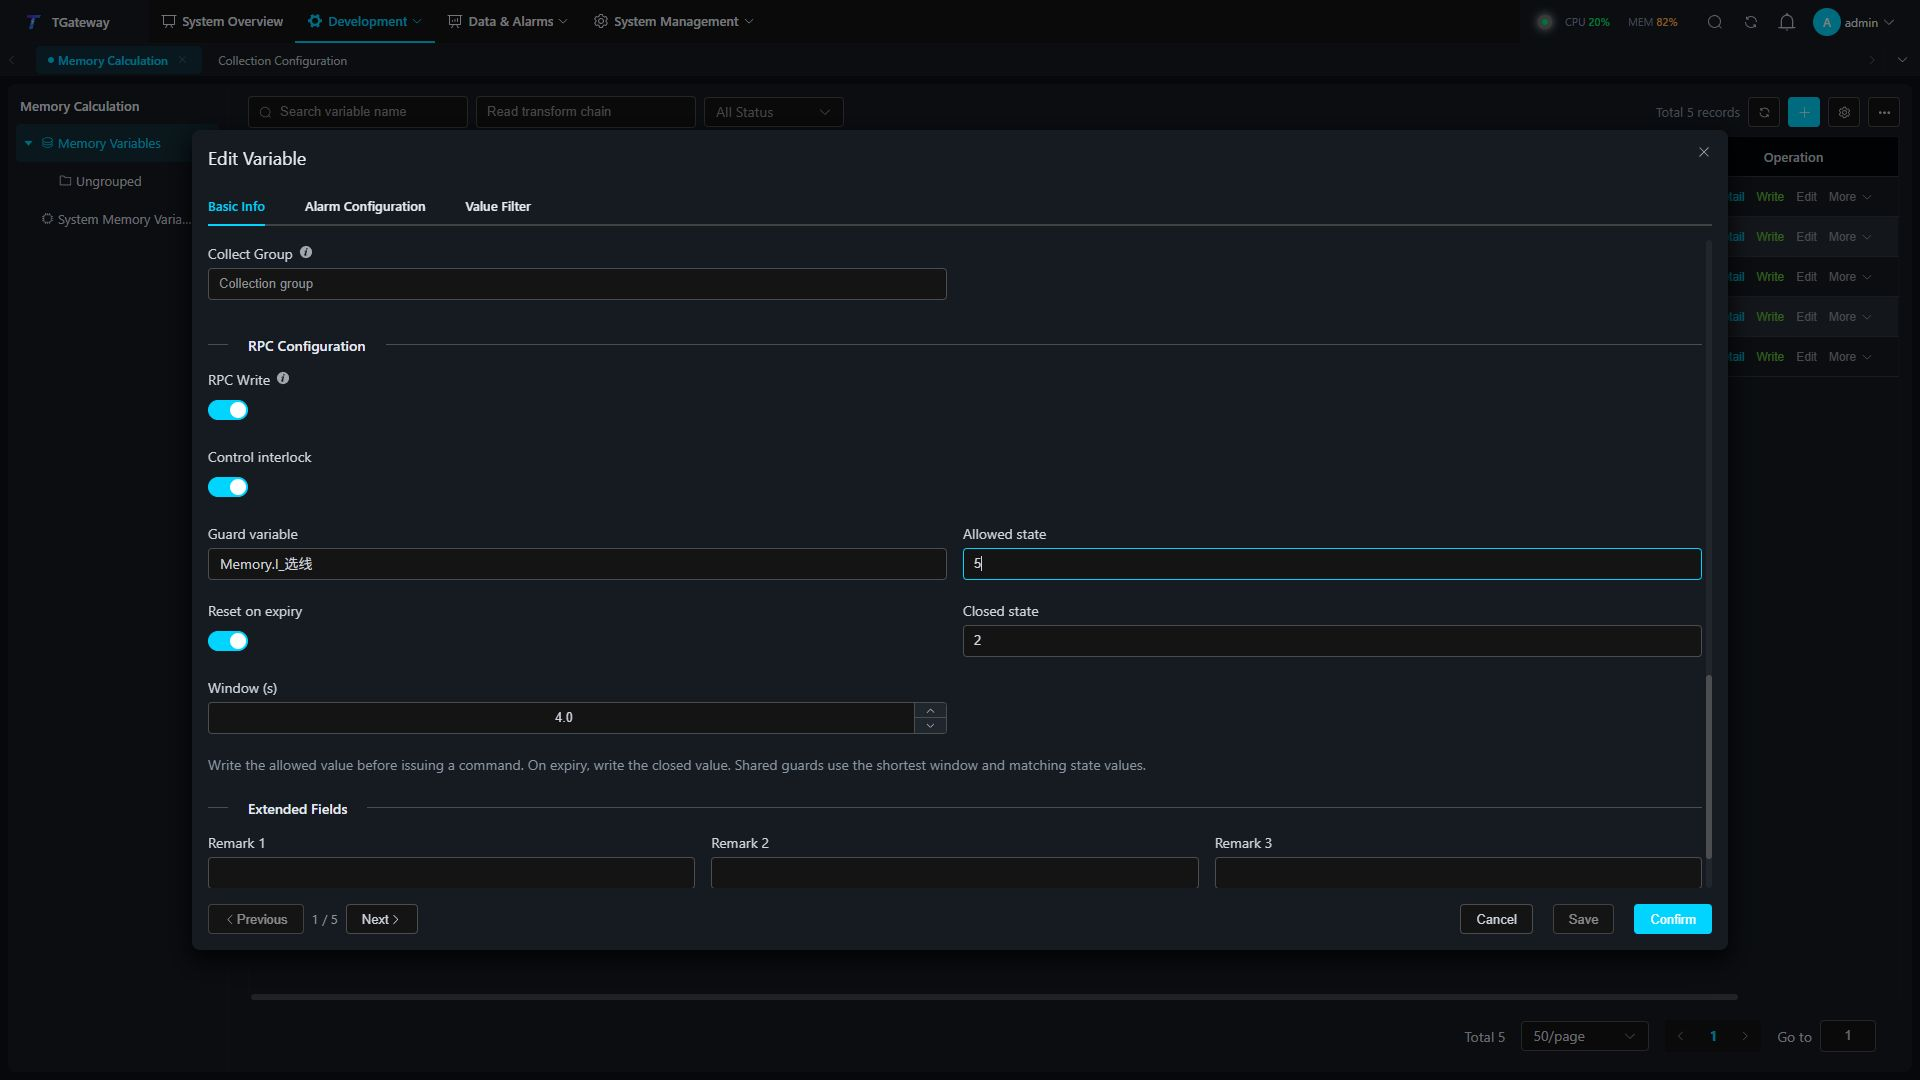
Selection and control must use separate requests. Shared automatic guards require matching allowed and closed states and use the shortest window. Reading a state other than the automatic allowed state revokes the existing selection. Even if the device later returns to the allowed value, select again through TG. Read-only mode continues to follow each actual read. Stop or reload revokes selection. A failed reset write cannot extend the expired authorization.
Address fields and dynamic methods
The variable address remains a text input for entering protocol addresses or method arguments directly. Click Edit fields on its right to configure the address area, station, function code, byte order, and other parameters in a dialog. Fields and available choices depend on the plugin and current configuration.
- Select the device, data type, and access permission, then click Edit fields. The dialog parses the current text into fields. Enable each option you want to set and enter its value. Unselected optional fields use the device or plugin default; an explicit
0differs from an unset option. - Click Confirm and fill. After validation, the dialog closes and the generated string fills the address input. Check it, then confirm the variable dialog to save the variable. Canceling or closing the field dialog preserves the original text.
- Enter addresses directly in the text input without switching modes. If the text cannot be fully parsed, cancel field editing to preserve special parameters, or complete the fields and explicitly confirm replacing the text.
- For a dynamic method, select a method allowed for the current access permission under Special method, then click Edit fields to configure its arguments and generate a JSON argument array. You can also enter JSON directly: an ordinary array parameter occupies one nested array item, and write values come from the actual RPC write. A method-only plugin requires a method; follow the displayed instructions for plugins with no address or system-managed addresses.
Confirm or cancel field editing before changing the device, data type, permission, array length, or method. Parsing fields and generating text validate configuration without sending read or write commands to a device. Verify collection results after saving the variable.
Common variable register options
For collection plugins that support common register conversion options, enter the protocol address in Variable address, then append key=value options separated by semicolons (;). Follow the plugin’s address rules. For node identifiers, Topics, or special-method arguments, check the plugin manual before appending these options.
- Open the variable’s New or Edit dialog and select the device and data type.
- Enter the starting address and append the conversion options required by the device point list.
- Save and compare the current and raw values. For strings, check that the text is complete and readable.
| Parameter | Description |
|---|---|
4-byte data format data | Syntax: data=ABCD. Options: ABCD, BADC, CDAB, and DCBA, as described below. Select the order required by the device point list for multi-byte values such as Int32, UInt32, and Float. |
String length len | Syntax: len=1. For common fixed-length string conversion, this is the byte length, not a character or register count. For String, enter the actual storage length, such as len=20. UTF-8 characters can occupy multiple bytes. Follow the plugin manual for special string layouts. |
BCD format bcd | Syntax: bcd=C8421. Options: C8421, C5421, C2421, C3, and Gray. Common conversion uses this for reading and writing encoded digits with the String data type. Set it only when the device uses the corresponding encoding; ordinary binary numbers do not require it. |
Character encoding encoding | Syntax: encoding=UTF-8. Common names include UTF-8, ASCII, and Unicode (UTF-16 little-endian); other encodings require runtime support. Enter the encoding name used by the device. |
Values such as =1 and =ABCD above illustrate the syntax; they are not universal plugin defaults. Unspecified conversion options follow the plugin or device configuration.
Explicit conversion parameters must be valid: data and bcd use defined options; encoding must be nonempty and supported by the runtime; len must be an integer from 0 to 65535; and vsl accepts only true or false. Select actual lengths and variable-length mode according to the device point list. Empty, misspelled, or out-of-range values report a parameter error rather than silently using defaults. Correct the configuration before checking collection again. Only omitted parameters use defaults.
4-byte data formats
Let A B C D represent the four bytes from most to least significant in the device point list. Select the actual transmission order:
| Value | Description |
|---|---|
ABCD | Big-Endian: A B C D. |
BADC | Big-Endian Byte Swap: B A D C. |
CDAB | Little-Endian Byte Swap: C D A B. |
DCBA | Little-Endian: D C B A. |
Combined examples
These examples use Modbus holding-register addresses. For other protocols, substitute a valid plugin address and select the data type specified by the device point list.
| Scenario | Configuration |
|---|---|
| 32-bit floating-point value | Select Float and enter 40001;data=CDAB for a device specifying CDAB. The value occupies two consecutive 16-bit registers. |
| Fixed-length ASCII string | Select String and enter 40001;len=20;encoding=ASCII. Reads 20 bytes across ten consecutive 16-bit registers. |
| UTF-8 string | Select String and enter 40001;len=20;encoding=UTF-8. The storage length is 20 bytes, which does not guarantee room for 20 characters. |
| BCD string | Select String and enter 40001;len=2;bcd=C8421 for a device storing decimal digits in two bytes of 8421 BCD. |
For incorrect multi-byte values, check the data type and data. For garbled or truncated strings, check encoding and len. See Modbus address rules for station IDs and function codes.
Alarm Configuration
| Configuration Items | Description |
|---|---|
| Boolean Alarm / Boolean Off-Alert | Boolean variable can be configured to enable and disable status alarms separately. Alarm activation is used when the value is true, and off alarm is used when the value is false. |
| High, high, low, low-low alarms | Numerical variables can be configured with upper and lower limit alarms. When enabling multiple limits, the threshold should meet “High High > High > Low > Low Low”; otherwise, an error will appear when saved. |
| Custom alarms | Alerts configured with custom conditions. Suitable for alarms such as equipment status codes, quality codes, and combination conditions, where only upper and lower limits can be described. |
| Alarm code / alarm text | For high/high-high/low/low-low groups, the code is the comparison limit, not an alarm identifier. For Custom, select a compiled Data Conversion condition script. Text describes the object, condition, and response. |
| Alarm Level | Alarm severity, ranging from 0 to 10, with higher values indicating more severity. |
| Alarm Delay | Triggered only after the alarm condition has been continuously reached for a set time, in milliseconds. Used to filter transient shaking; Setting it to 0 means the alarm will sound immediately once the condition is met. |
| Suppression Expression | A Data Conversion script returning true allows the alarm; false blocks it. Empty adds no constraint. It does not alter the collected value. |
High/high-high use strict greater-than and low/low-low use strict less-than; equality does not meet the corresponding condition. Numeric state mappings match exact values, with independent enablement, text, level, delay, and suppression per row. Enabled state values must be unique. See Alarm Conditions.
Value Filtering
| Configuration Items | Description |
|---|---|
| Range Filtering | Accepts values between minimum and maximum, including both endpoints. Maximum must be at least minimum. |
| Amplitude Filtering | Compares against the last accepted value. An absolute or percentage limit of 0 disables that limit. Percentage uses the absolute previous value as the denominator and is skipped for a zero baseline. |
| Continuous Filtering | Counts consecutive rejected samples. When the configured count is reached, accepts that abnormal sample and resets the count. Rejected values need not be identical; a normal accepted sample resets the count. |
Value filtering is only used for numeric variables; Strings and boolean variables do not display this tab. If the filtering parameters are set too tightly, true changes will be filtered out. Before setting, confirm based on the field range, sampling cycle, and allowable fluctuation range.
Online collection applies the read expression, rounds the resulting scalar according to Decimal Places, then evaluates value filtering. Set range and amplitude limits in those engineering units. For example, raw 1234 scaled by 0.1 is evaluated as 123.4, including any configured rounding.
Compare raw and current values, sample/change times, and quality while testing boundaries. Rejected samples can update the raw value and collection time while retaining the accepted current value. Test using the source register and a consistent baseline. Memory assignments do not establish collection-filter behavior. Configure reverse write conversion separately.
Verify rounding and conversion
Decimal places changes the final runtime number used by calculations, alarms, and change triggers. With a raw Double value of 23.4567, setting 2 produces 23.46; setting 0 produces 23; clearing the field preserves the original precision. Midpoint rounding goes away from zero. Arrays, booleans, and strings are not rounded by this scalar rule. This setting does not perform engineering-unit scaling.
For scaling, bind a read conversion and check both raw and current values. Configure the inverse write conversion independently, then verify the actual source readback.
Read, write and debug
Variable Details and Writing
Click “Details” in the variable row to open the variable details drawer.
| Partition | Description |
|---|---|
| Basic Information | Displays variable ID, name, device, description, status, and enabled status. |
| Address Configuration | Displays register addresses, array lengths, special methods, and source information. |
| Data Information | Displays current value, original value, last set value, data type, unit, and interval. |
| Expression Configuration | Displays read/write expressions and parameters. |
| Alarm Information | Variable Alarm Display the alarm configuration and runtime alarm status after alarm activation is enabled. |
| Value filtering | variable is configured to display filtering parameters during value filtering. |
| Historical Data / Historical Alarms | Query the history of the current variable in the Details drawer; Historical alarms are displayed when variable alarms are enabled. |
Click “Write” in the variable row to open the write popup.
| Configuration Item | Description |
|---|---|
| Device Name | The device to which the current variable belongs, displayed read-only. |
| Variable Name | Current Write Variable, read-only display. |
| Current value | Write the variable value read from the previous page. |
| Write Value | The value to be sent, formatted to match the variable data type. |
Note:
Writing variables will affect on-site equipment. Before performing writes, please confirm the variable read/write permissions, write value ranges, and on-site security conditions.
Device Details and Debugging
Select a device on the left, then open Details or Protocol Debug at the top of its workbench. The upper-right area shows whether the object is enabled and whether a runtime instance is available; use its edit button to change the device configuration.
| Entry or Tab | Description |
|---|---|
| Real-time Variables | View current values, quality, sample times, and errors. |
| Details | View basic device information, channel configuration, runtime state, plugin properties, and redundancy configuration. |
| Protocol Debug | Open plugin tools such as address read/write, node browsing, message capture, or protocol-specific diagnostics. |
| Channel Logs | View the communication logs of the channel to which the device belongs. |
| Device Logs | View the current device operation logs and error messages. |
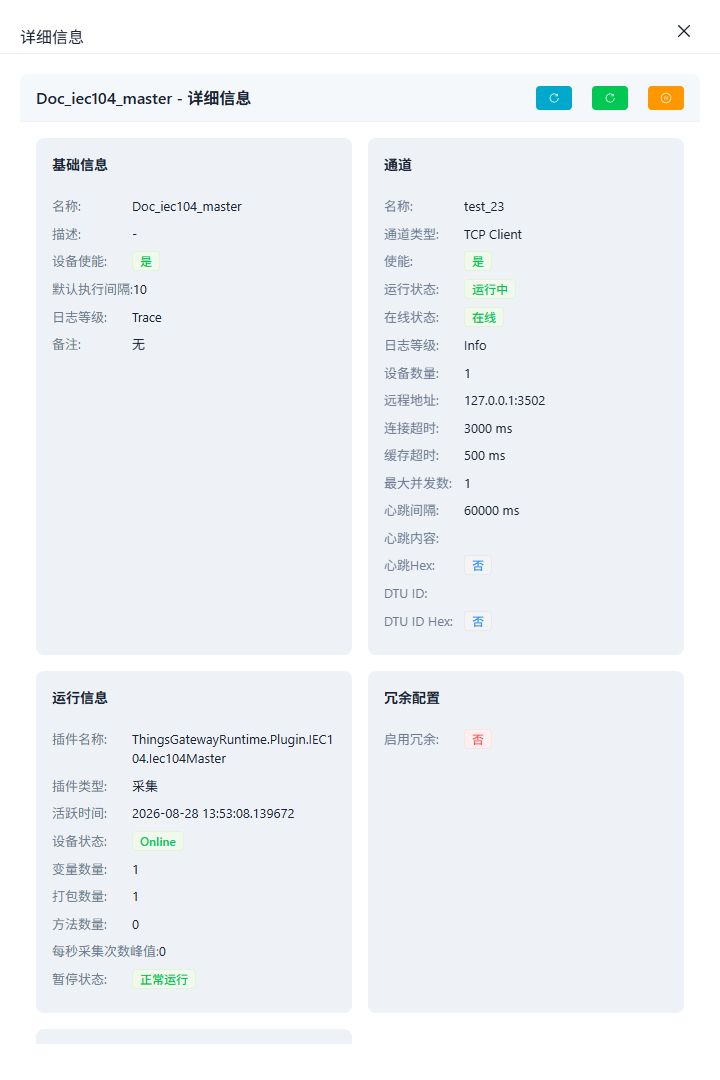
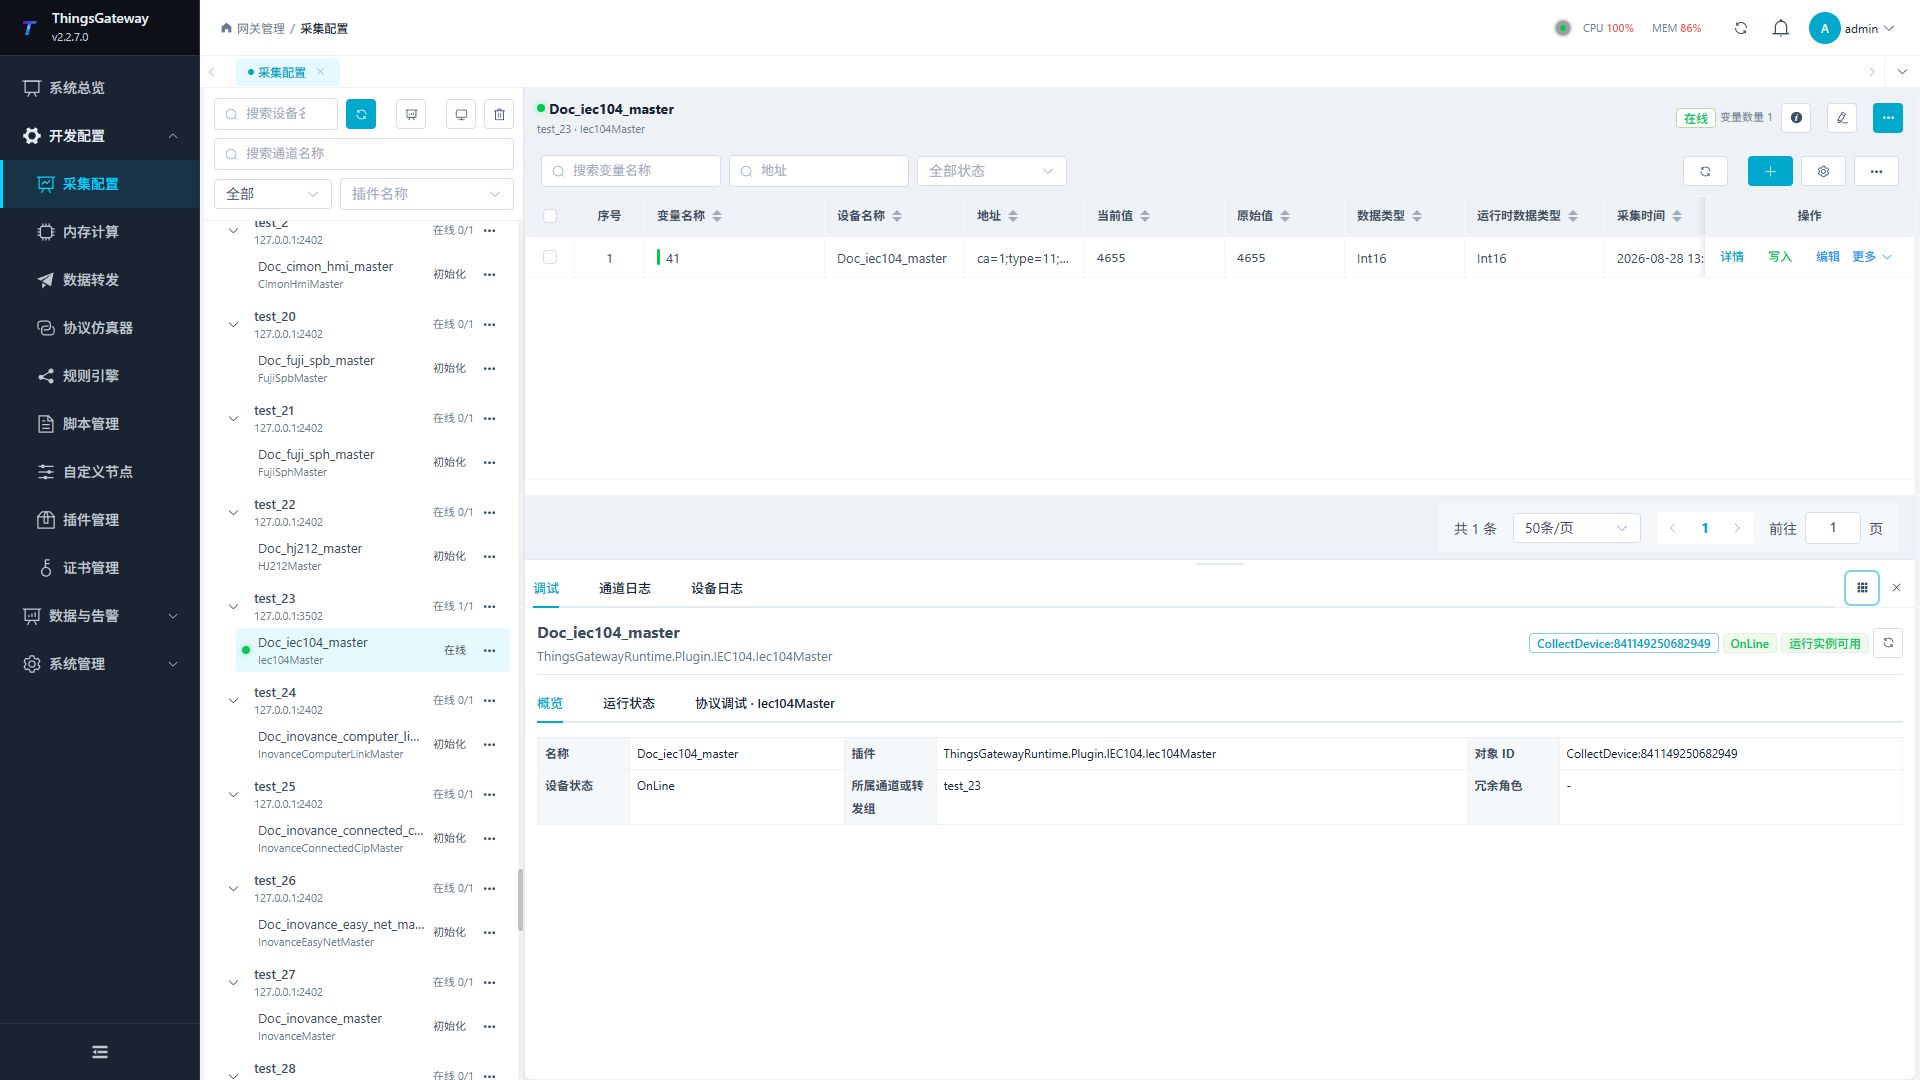
The available debug tabs depend on the selected plugin. When the object is disabled or its runtime instance is unavailable, you can inspect the panel and edit parameters; communication operations require a running instance. Check the device, channel, and plugin properties before reading a known address.
Channel and device logs retain filtering, automatic refresh, export, and pagination inside the workspace.
When a plugin provides a protocol panel, open Protocol Debug and select its dedicated tab. Consult the plugin manual for address rules and operation requirements.
Switching devices immediately closes the previous debug panel and message-capture connection. Start message capture again from the new device when required.
For detailed debugging steps, open the matching page in the Plugin Manual Index.
Test Data
Click “Show more → test data” to open the test data generation popup. This feature is used to generate demo or stress test configurations.
| Configuration Items | Description |
|---|---|
| Data Type | Select Normal Test Data or DTU Test Data. |
| Number of variables | Number of variables generated under standard test data. |
| Number of devices | Number of test devices to be generated. |
| Slave Address | Slave address or connection information used when generating the device. |
| Enable data forwarding | Configure whether data forwarding is generated synchronously under normal test data. |
| Generate | Generate test configurations based on the quantity and options entered in the pop-up. |
Normal test data creates a separate collection channel for each test device, which is useful for checking multiple devices and connections. DTU test data uses one TCP service channel for multiple DTUs; that is a DTU-specific shared-connection mode, not the default for ordinary collection devices.
Before using test data in production environments, it should be confirmed that the name and quantity are not confused with the official configuration.
Import and Export
Collect Configuration Import and Export is located in the “Show More” menu at the top right of the variable list.
Control interlocks use separate Excel columns rather than a JSON cell. Identify the guard using Interlock device name and Interlock variable name, without a database ID. The guard may already exist or be added in the same worksheet, in any row order.
| Interlock column | Entry |
|---|---|
| Interlock device name | Exact name of the guard’s device, either existing or imported. |
| Interlock variable name | Guard variable name within that device. Leave both names empty to disable the interlock. |
| Interlock allowed value | State that permits control; defaults to 1 when empty. |
| Interlock closed value | State written at expiry; defaults to 0 when empty. |
| Interlock reset enabled | TRUE or FALSE; enabled when empty. FALSE actively reads the external state without timing or writing the guard. |
| Interlock timeout (s) | From 0.1 to 86400 when automatic reset is enabled; defaults to 10 when empty. |
An incomplete name pair, missing guard, or self-reference produces a row error and prevents committing that variable sheet. Format state cells as text to preserve leading zeros.
| Operation | Description |
|---|---|
| Import Collection Configuration | Import channel, device, and variable configuration. |
| Export the current collection configuration | Export by current filters, resource scope, page, and page size. |
| Export all collection configurations | Export all collection configurations. |
After importing is complete, the import result will be displayed. When importing on site, focus on checking the failed rows, field names, and error details, then correct the Excel prompts and re-import.
Selecting the file starts import immediately, without a shared preview stage. Use a current export as the template, preserve worksheet headers and name-based associations, and inspect every sheet’s result. New names add objects; existing names update them. See Batch Configuration for copies, partial updates, and full-export verification.
Verify and troubleshoot
Validation Results
After configuration, verify the following:
- The channel and device are online, without persistent connection or read/write errors in their logs.
- Selecting the device displays its variables, and the values, addresses, and data types match the field point list.
- A representative read from Protocol Debug matches the variable list and field device.
- Channel Log and Device Log filtering, automatic refresh, and pagination are available.
Use Notes
| Scenarios | Recommendations |
|---|---|
| Create a new collection link | Build channels first, then equipment, and finally variables. |
| Device offline | Check channel parameters, device plugin properties, and network or serial connections. |
| Variable anomalies | Check variable addresses, data types, device online status, and device logs. |
| Batch import | First import validation in the test environment, then import into the production environment. |
| Delete channels or devices | First confirm that lower-level devices, variables, and data forwarding configurations are no longer in use. |
Related Links
After the first point works, continue with the task you need:
| Next task | Guide |
|---|---|
| Configure backup endpoints, layered timeouts, serial ports, and TLS | Channels and Transport |
| Set scan periods, packing, concurrency, retries, and device states | Collection Strategy |
| Import large point lists, copy devices, or make bulk changes | Batch Configuration |
| Diagnose quality, timestamps, logs, and raw traffic | Collection Debugging |
| Evaluate large device and variable loads | Capacity Planning |
For a private protocol described by fixed requests, framing rules, and data offsets, see Custom Full Packet.
- System Overview - System Status Monitoring
- Real-Time Alarm - Alarm Monitoring and Handling
- Data Forwarding - Data Collection Forwarding Configuration
- Plugin Manual Index - Per-plugin properties, addresses, special methods, debugging, and troubleshooting